Struts Message Resources Tutorial
Many programmers new to struts often encounters difficulties in handling the functionality of the struts message resources. This tutorial explains the usage of struts message resources and shows with a working example how you can work with the message resources in JSP and Action Classes
Generals
Author:
Sascha Wolski
http://www.laliluna.de/tutorials.htmlDate:
November, 11 2004
Source code:
http://www.laliluna.de/assets/tutorials/struts-message-resources-tutorial.zip
PDF Version des Tutorials:
http://www.laliluna.de/assets/tutorials/struts-message-resources-tutorial-en.pdf
Development Tools
Eclipse 3.x
MyEclipse plugin 3.8
(A cheap and quite powerful Extension to Eclipse to develop Web Applications and EJB (J2EE) Applications. I think that there is a test version availalable at MyEclipse.)
Database
PostgreSQL 8.0 Beta
Application Server
Jboss 3.2.5
You may use Tomcat here if you like.
What are message resources
The message resource class allows the developer internationalising his web application easy and fast. He can put labels of fields or discription textes in a central file and can access them later in the JSP File. The advantage is that you can reuse labels like error messages, titles in multiple JSP files and you can provide the ressource files in multiple languages.
Configuration
There are two ways to tell Struts the location of your resource bundle. In your web.xml or in your struts-config.xml.
web.xml
<servlet>
<servlet-name>action</servlet-name>
<servlet-class>
    org.apache.struts.action.ActionServlet
</servlet-class>
<init-param>
<param-name>
    application
</param-name>
<param-value>
    de.laliluna.tutorials.library.struts.ApplicationResources
</param-value>
</init-param>
</servlet>
With the configuration you set the name of the message resource bundle to ApplicationResources.properties and the package, where the files are found de.laliluna.tutorials.library.struts. The extension ?.properties? will be added by struts. You don�t need to add the extension by your self, also there are more than one message resource files, for example ApplicationResources_fr.properties for frances. You only define the general name of the message resource bundle.
The second way to define the message resource bundle is the struts-confg.xml.
<message-resources parameter="de.laliluna.tutorials.library.struts.ApplicationResources"/>
The statement is the same like in the web.xml.
Its required to use the second way to define the message resource bundle, because you have additional flexibility.
You can define more than one message resource file. Therefor you must add a parameter key to the tag <message-resource>. With this key struts knows which message resource file to access.
<message-resources key="myResources" parameter="de.laliluna.tutorials.library.struts.ApplicationResources"/>

<message-resources key="moreResources" parameter="de.laliluna.tutorials.library.struts.MoreApplicationResources"/>
Setting the null attribute to "false" will display missing
resource values as ???key??? instead of displaying
null. This string is easily found during automated testing of your JSPs.
<message-resources parameter="de.laliluna.tutorials.library.struts.ApplicationResources" null="false"/>
The message resource files
Inside the message resource files you can define the keys and their values.
A message resource file can look like the
following
label.username=Username
label.password=Password
label.first.name=First Name
label.last.name=Last Name
label.email=Email Address
label.phone.number=Phone Number
label.welcome=Welcome back {0} {1}!

error.min.length=The input must be at least {0} characters in length.
error.max.length=The input cannot be longer than {0} characters in length.
You define a key (label.username) and assign a value (Username). Later you can print the label by using the key in your JSP oder action class.
Placeholder
It is possible using placeholder in a message key. So you can insert dynamic contents in your JSP file or action class, for example the actualy date or a username of a user. You can have up to four parameter fields per value string.
label.welcome=Welcome back {0} {1}!
In this example the first substitute symbol stands for the first name, second for the surname.
Later the message printed looks like the following:
Welcome back John Dilinger
Internationalising
If you want to internationalise your web application with the message resources, you have to add the Locale suffic. For France or Brazilian it looks like the following:
ApplicationResources_fr.properties
ApplicationResources_br.properties
Futhermore it is possible to combine more as one local in a message resource file.
ApplicationResources_fr_br.properties
How does it work ?
-
The message is located with specific Locale. If the message cannot be found, more generic Locals are used. If the message cannot be found in
ApplicationResources_fr_br.properties(France Brazilian), the fileApplicationResources_pt.properties (and therefor Locale) will searched. If this file does not exist or the message key cannot be found the global fileApplicationResources.properties will be used. -
If the message key is found, it is added to a Locale-specific cache and returned as a java.lang.String. -
If the message key is not found, null or ???key? is returned, depending on which value(true / false) is assinged to the parameternull of the element <messages-resources>.
Usage of message resources in JSP files
You can use two tags to print out a message key in your JSP file.
The most used tag is <bean:message>
<bean:message key="label.password"/>
<bean:message key="error.min.length" arg0="6"/>
<bean:message key="label.welcome" arg0="John" arg1="Dilinger"/>
The parameter Key defines the message key. If the message key cannot be found, null is returned, if the parameter null is true, otherwise ???key? is returned. The parameter arg0 ? arg3 are used to define the values of the placeholder, which you inserted in your message resource file.
If you use more than one resource file, you have to set a parameter bundle, which is the key of the message resource bundle. You set the key of the resource bundle in your struts-config.xml.
<bean:message bundle="moreResources" key="some.message.key"/>
Another way to use message keys is <html:messages>. This tag is used to show errors or messages, in a form input mask for example. The errors or message are taken from the request.
<logic:messagesPresent message="true">
  <html:messages id="msg" message="true">
      <bean:write name="msg"/> <br/>
  </html:messages>
</logic:messagesPresent>
The tag <logic:messagesPresent> checks if there are some errors or messages in the request. With the parameter message you can define if messages or errors will be displayed. Default are errors. The tag <html:message> loops over the messages or errors saved in the request. The parameter id defines one message or error, which is printed out with <bean:write>.
Errors and messages will be added to the request in the action class, in order to print out these with the tag
<html:messages> . You can use two methods saveMessages() and
saveErrors().
Usage of message resources in action classes
It is also possible to access a message resource in an action class. This is an advantage if you add ActionErrors or ActionMessages, which are printed out with tag <html:messages> in your JSP file. A simple example should illustrate this:
Message resource file
label.username=Username
label.password=Password
error.missing.key=The fields are missing: {0} and {1}
Action Class
MessageResources messageResources = getResources(request);

ActionErrors actionErrors = new ActionErrors();
actionErrors.add("error", new ActionMessage("error.missing.key", messageResources.getMessage("label.username"), messageResources.getMessage("label.password")));
saveErrors(request, actionErrors);
The methode getResources(request) get the message resource file by the Locale specify in the request. Now we create a
intance of ActionErrors, which is later saved in the request. The method add insert a error into actionErrors. SaveErrors() save
the erros in the request.. The method new
ActionMessage() reads a message key. The two parameter of the method define the value of the placeholder. Its the same like the
parameter arg0-arg3 of <bean:message>. The method getMessage("label.username") read the value of the key label.username and replace it with the placeholder.
Create the example application
Create a new struts project with File > New > Project or use the shortcut Strg + n.
Select the Wizard in J2EE Web
Project
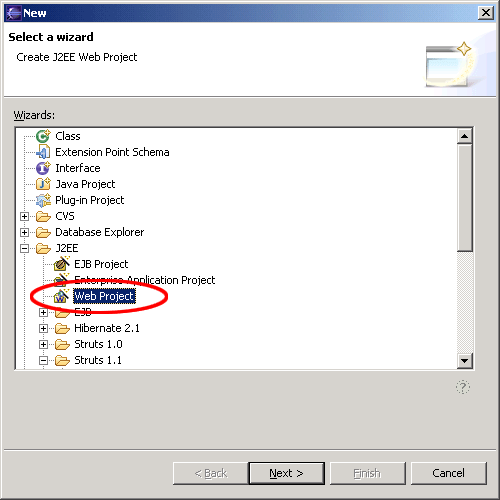
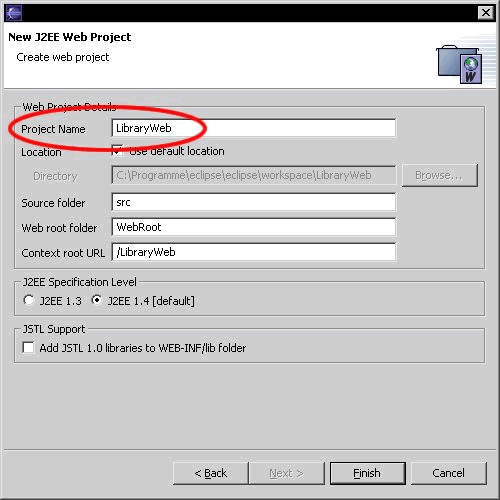
Create a nice name for your project
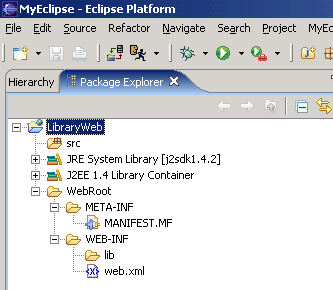
After creating the project, your Package Explorer looks like the picture below.
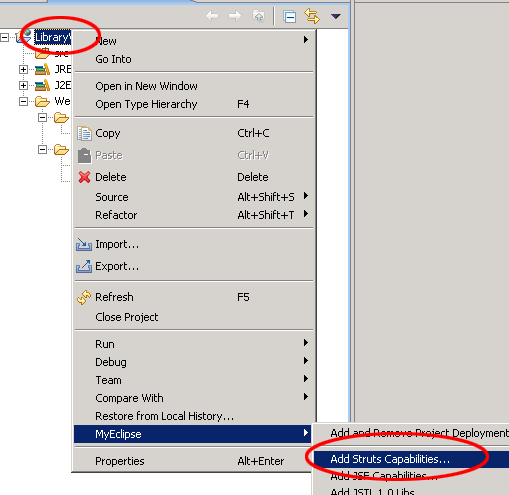
For now your project is a normal J2EE project, so we need to add the struts capabilityies. Right click on the project and add the capabilities for struts with Add Struts Capabilityies.
Change the properties Base package for new classes and
Default application resource

Edit the message resource files
Open the file ApplicationResources.properties in the package de.laliluna.tutorials.library.struts and add the following message keys.
title.add=Add a new book
title.edit=Edit a book
title.list=Show book list

label.booklist=Show book list
label.author=Author
label.title=Title
label.available=Available
label.edit=Edit
label.delete=Delete
label.new=Add a new book

label.save=Save

error.field=The field {0} is empty.
We add another language (German). Create a new files with the Locale de,
ApplicationResources_de.properties, and assign the german values to the message keys.
title.add=Neues Buch hinzuf�gen
title.edit=Buch editieren
title.list=Zeige B�cherliste

label.booklist=Zeige B�cherliste
label.author=Autor
label.title=Titel
label.available=Verf�gbarkeit
label.edit=Bearbeiten
label.delete=L�schen
label.new=Neues Buch hinzuf�gen

label.save=Speichern

error.field=Das Feld {0} ist leer.
Create a default welcome page
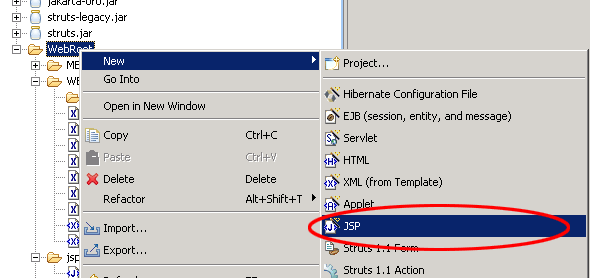
Ok, now we want to create a default page. Right click (yes again) on the Folder WebRoot in the Project and choose New > JSP.
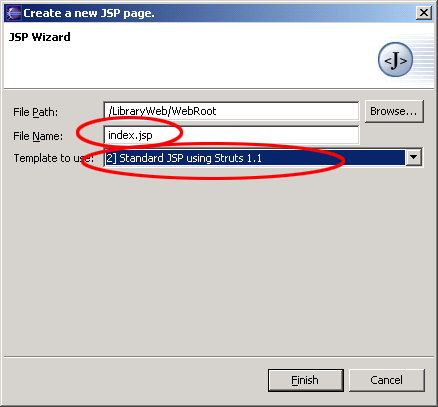
Set the name to index.jsp and choose on template to use > Standard JSP using Struts 1.1 MyEcplise will use the template to create the JSP File.
You will find the file index.jsp in the folder WebRoot of the project. On the top of the file you will find the struts tag libraries. These includes will be used to access the tags of struts. In your case we only need the logic tag library.
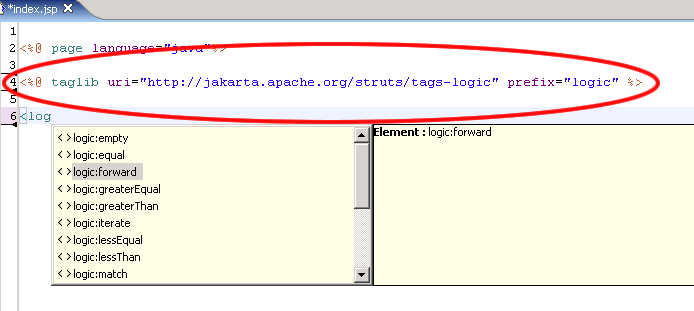
Insert the following line below the included logic tag.
<logic:forward name="welcome" />
This line instructs struts to forward to a forward named welcome. If the application doesn�t find this forward it will
produce an error. In the next section I briefly explain the action forward.
Create a second index.jsp file in the folder /WebRoot/jsp
Change the body of the file to the following
<body>
 <bean:message key="title.welcome" />
 <br>
 <html:link action="bookList">
 <bean:message key="label.booklist" />
 </html:link>
</body>
Global Action Forwards and Action Mappings
What is an action forward?
A action forward can be used to forward to a jsp or action mapping. There are two different action forwards. The global action
forward and the local action forward. You can access a global action forward on each jsp or action class. A local action forward
can only be accessed by the assigned action class.
What is a action mapping?
The action mapping is the heart of struts. It managed all actions between the application and the user. You can define which
action will be executed by creating a action mapping.
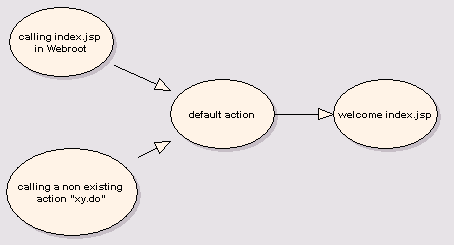
The diagram show you, how the application server manage the request of the index.jsp or a non existing action mapping.
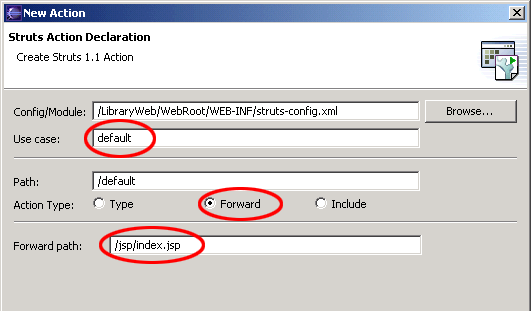
In the first step we create a new action mapping. Open the struts-config.xml, you will find it in the folder WebRoot/WEB-INF. Right click in the outline window on action-mapping.

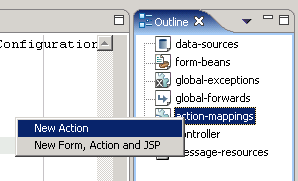
Choose Use Case default and Action Type Forward. The Forward Path is the welcome page /jsp/index.jsp
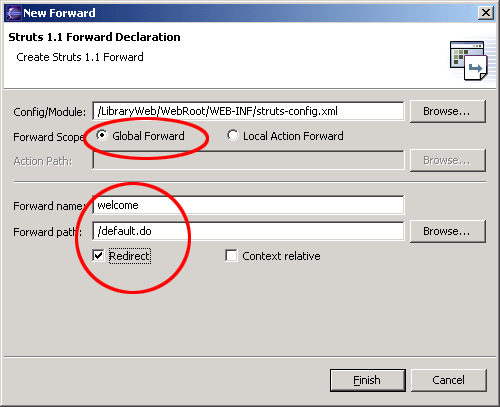
In the second step you create a global action forward. Go back to the outline window of MyEclipse and choose Global Forward
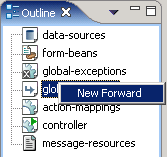
Choose the Forward Scope Global Forward. For name use the same you have set in your default page. The Global Forward refers to your action mapping.
You will see the following in your editor window.
<global-forwards >
 <forward name="welcome" path="/default.do" redirect="true" />
</global-forwards>
<action-mappings >
 <action forward="/jsp/index.jsp" path="/default" />
</action-mappings>
To catch all requests of non existing action mappings, we have to add a parameter unknow="true" to the action forward.
<action-mappings >
 <action forward="/jsp/index.jsp" path="/default" unknown="true"/>
</action-mappings>
Create a object class ?book?
Create a new class Book in the package de.laliluna.tutorial.library.
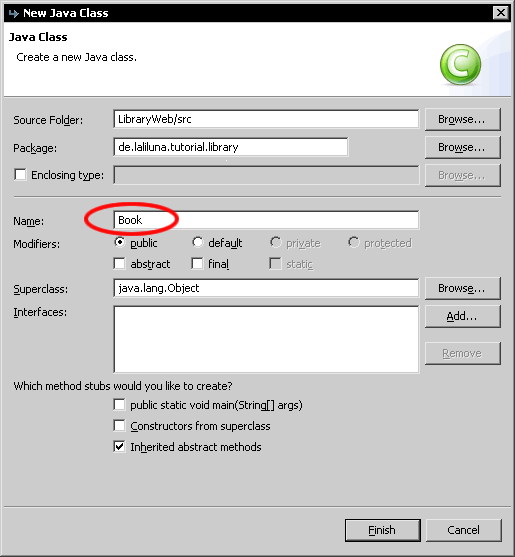
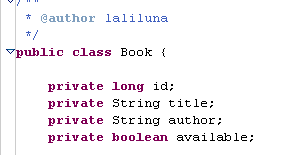
The Class Book represents a book with the properties id, author, title and available.
Create four variables.
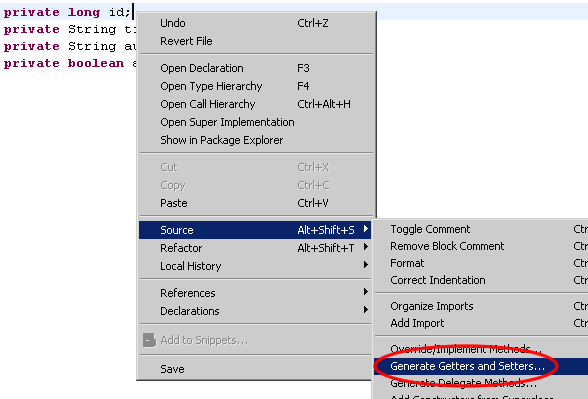
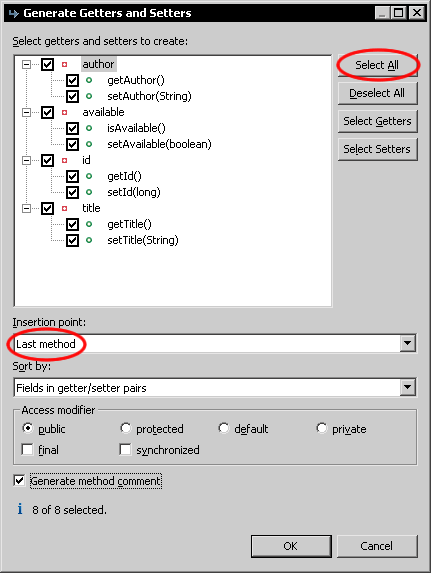
Create a getter and setter for each variable. Right click in your class, Source > Generate Getters and Setters
Choose Select All and insertion point Last method.
Add two constructors to the class to set the properties on initialisation of the class.
// Contructor
public Book(){}

//  Contructor to initial the properties
public Book(long id, String author, String title, boolean available) {
	this.id = id;
      this.author = author;
      this.title = title;
      this.available = available;
}
Thats all !
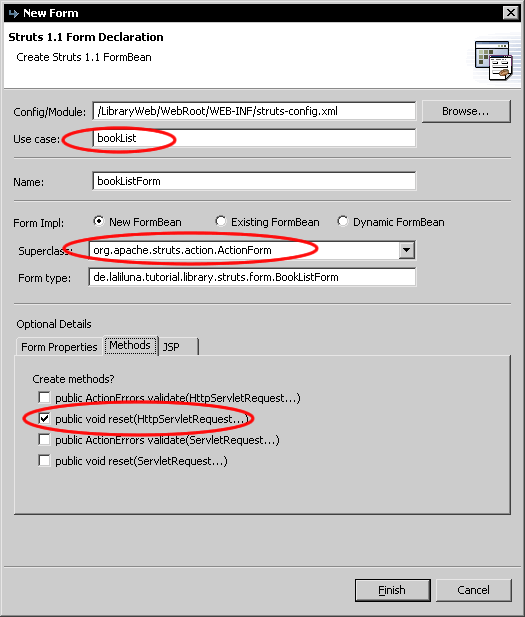
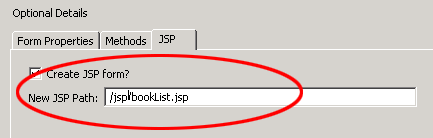
Create a form bean, action form and jsp
Open the struts-config.xml. Right click on Form Bean in the outline window.
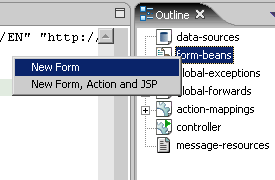
Use Case is bookList, Superclass org.apache.struts.ActionForm. Select only public void reset.. on methods. Set the name of the jsp file on JSP.
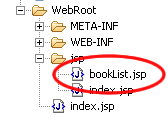
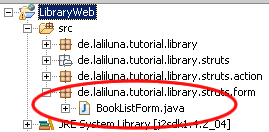
The package explorer looks like the pictures below.
Edit the source code of the action form class
Open the file BookListForm.java and add the following soure code.
public class BookListForm extends ActionForm {

 	private Collection books;

	/* lalinuna.de 02.11.2004
 	* get the collection books
 	*/
 	public Collection getBooks() {
 		return books;
 	}

 	/* lalinuna.de 02.11.2004
 	* set the collection books
 	*/
 	public void setBooks(Collection books) {
 		this.books = books;
 	}

	/* lalinuna.de 02.11.2004
 	* reset the collection books
 	*/
 	public void reset(ActionMapping arg0, HttpServletRequest arg1) {
		books = new ArrayList();
 	}
}
Define a collection books and generate a getter and setter. In your reset method initial the collection with an array list.
Create an action mapping and action class
Open the struts-config.xml and create a new action mapping.
Use Case is bookList, choose Create new Action Class
Superclass org.apache.struts.Action
On Optional Details choose the
Form Bean bookListForm.
The input source is /jsp/bookList.jsp
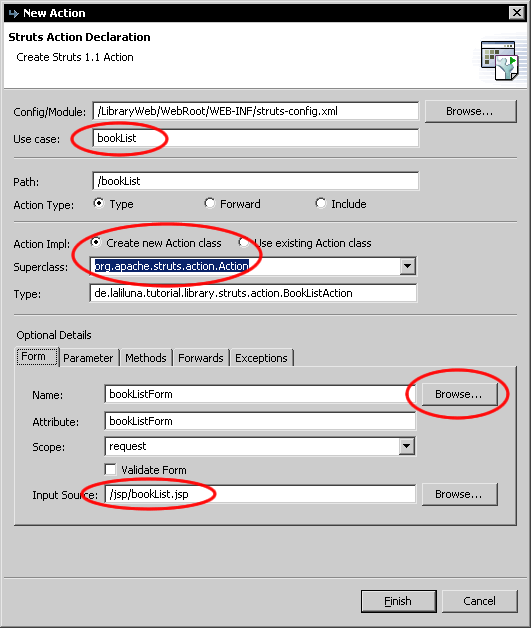
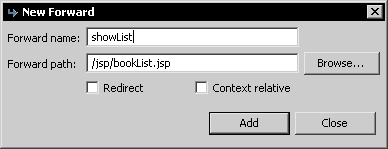
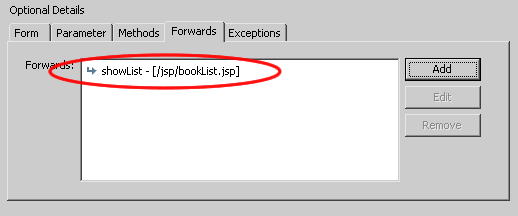
Now add a forward showList to the action mapping.
You will find the action class bookListAction in your package de.laliluna.tutorial.library.action.
Class to provide test data
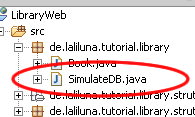
We do not use a database in this tutorial and want some test data. Open the source application package you have downloaded and copy the class simulateDB.java in your package de.laliluna.tutorial.library.
Edit the source code of the action class
Open the class bookListAction and edit the method execute. The command mapping.findForward(?showList?) will search for a local
forward with the name showList
/**
 * Method execute
 * @param mapping
 * @param form
 * @param request
 * @param response
 * @return ActionForward
 */
 public ActionForward execute(
	ActionMapping mapping,
	ActionForm form,
	HttpServletRequest request,
	HttpServletResponse response) {
	BookListForm bookListForm = (BookListForm) form;


   /* lalinuna.de 03.11.2004
    * init SimulateDB class and set some dummy data
    */
    SimulateDB simulateDB = new SimulateDB();
    bookListForm.setBooks(simulateDB.getAllBooks(request.getSession()));


    return mapping.findForward("showList");
 }
Yeah thats all, you have now created your form bean with an action form class, an action mapping with an action class and the jsp to display something.
Output the test data on the jsp file
Open the file bookList.jsp and add the following source code
<%@ page language="java"%>
<%@ taglib uri="http://jakarta.apache.org/struts/tags-bean" prefix="bean"%>
<%@ taglib uri="http://jakarta.apache.org/struts/tags-html" prefix="html"%>
<%@ taglib uri="http://jakarta.apache.org/struts/tags-logic" prefix="logic" %>

<html>
 <head>
 <title><bean:message key="title.list" /></title>
 </head>
 <body>

 <table border="1">
 <tbody>
 <%-- set the header --%>
 <tr>
 <td><bean:message key="label.author" /></td>
 <td><bean:message key="label.title" /></td>
 <td><bean:message key="label.available" /></td>
 </tr>
 <%-- start with an iterate over the collection books --%>
 <logic:iterate name="bookListForm" property="books" id="book">
 <tr>
 <%-- print out the book informations --%>
 <td><bean:write name="book" property="author" /></td>
 <td><bean:write name="book" property="title" /></td>
 <td><html:checkbox disabled="true"
 name="book"
 property="available"/>
		</td>
 </tr>
 </logic:iterate> <%-- end interate --%>
 </tbody>
 </table>
 </body>
</html>
The tag <logic:iterate> loops over the collection books of the form bean bookListForm
Within the tag
<logic:iterate> you have access to the properties of the book. The tag <bean:write> prints out a property (author,
title) on the current position.
<html:checkbox> creates a checkbox.
Add, edit and remove the data
In the next section we add the functionality to add, edit and remove the data.
New form bean
Create a new form bean and action form class. Set Use case to bookEdit and remove all methods on Optional details ? Methods. Let MyEcplise create the jsp file for us.
Open the class BookEditForm.java in de.laliluna.tutorial.library.form .
Create a new instance book of the class Book
Book book = new Book();
Generate a getter and setter and delegate all methods of the class Book.

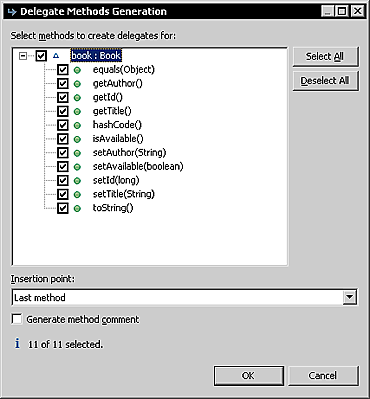
The source code looks like the following.
public class BookEditForm extends ActionForm {

	Book book = new Book();

	public Book getBook() {
		return book;
	}
	public void setBook(Book book) {
		this.book = book;
	}
	public boolean equals(Object arg0) {
		return book.equals(arg0);
	}
	public String getAuthor() {
		return book.getAuthor();
	}
	public long getId() {
		return book.getId();
	}
	public String getTitle() {
		return book.getTitle();
	}
	public int hashCode() {
		return book.hashCode();
	}
	public boolean isAvailable() {
		return book.isAvailable();
	}
	public void setAuthor(String author) {
		book.setAuthor(author);
	}
	public void setAvailable(boolean available) {
		book.setAvailable(available);
	}
	public void setId(long id) {
		book.setId(id);
	}
	public void setTitle(String title) {
		book.setTitle(title);
	}
	public String toString() {
		return book.toString();
	}
}
The class Book is set in the action form class and we have access to the properties.
Action mapping
Create a new action mapping. There is a different between our first action class. The new action class will extends to the
superclass org.apache.struts.DispatchAction.
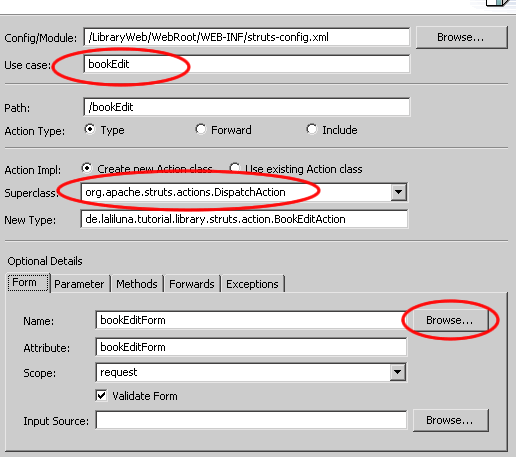
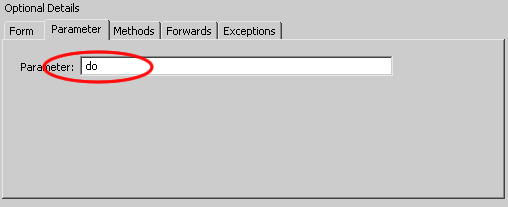
On Parameter we add a parameter do. These parameter is needed by the dispatch action class.
Add three new forwards. One is for the edit page, the second for the add page, where you can add the books and the last forward redirect the user to the book listing.
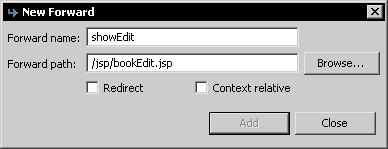

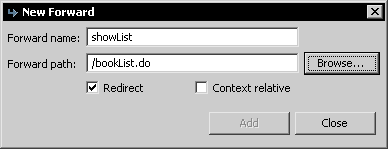
The last forward is different to the others. It refers to an existing action mapping and redirect the user.
Now create a new jsp file bookAdd.jsp in the folder /WebRoot/jsp. The forward showAdd refres to this page.
Add the source code to the jsp files
Open the file bookAdd.jsp and add the following source code.
<%@ page language="java"%>
<%@ taglib uri="http://jakarta.apache.org/struts/tags-bean" prefix="bean"%>
<%@ taglib uri="http://jakarta.apache.org/struts/tags-html" prefix="html"%>
<%@ taglib uri="http://jakarta.apache.org/struts/tags-logic" prefix="logic" %>

<html>
 <head>
 <title><bean:message key="title.add"/></title>
 </head>
 <body>
 <%-- create a html form --%>
 <html:form action="bookEdit">
 <%-- print out the form data --%>
 <table border="1">
 <tbody>
 <tr>
 <td><bean:message key="label.author"/>:</td>
 <td><html:text property="author" /></td>
 </tr>
 <tr>
 <td><bean:message key="label.title"/>:</td>
 <td><html:text property="title" /></td>
 </tr>
 <tr>
 <td><bean:message key="label.available"/>:</td>
 <td><html:checkbox property="available" /></td>
 </tr>
 <tr>
 <td colspan="2">
 <html:submit>
<bean:message key="label.save"/>
 </html:submit>
 </td>
 </tr>
 </tbody>
 </table>
 <%-- set the parameter for the dispatch action --%>
 <html:hidden property="do" value="saveBook" />
 </html:form>
 </body>
</html>
The tag <html:form> creates a new HTML form and refers with the parameter action=?bookEdit? to the action mapping. The Tag
<html:text> creates a text field with the property author of the book.
<html:hidden> is a hidden form field with
the name do. We need this hidden field, because it tells the dispatch action class which method will called.
Open the file bookEdit.jsp. You can use the source code of the of the file bookAdd.jsp and change the following lines.
<title><bean:message key="title.edit"/></title>
After the line
<html:form action="bookEdit">
add the error message output
<html:messages id="err" message="false">
 <font style="font-weight:bold; color=#FF0000">
 <bean:write name="err" />
 </font>
 <br>
</html:messages>
Add the following line above <html:hidden property="do" value="saveBook" />
<%-- hidden field that contains the id of the book --%>
<html:hidden property="id" />
Thats all.
Source code of the dispatch action class
Ope the file bookEditAction.java and add the following methods.
/**
 * Method editBook
 * @param mapping
 * @param form
 * @param request
 * @param response
 * @return ActionForward
 */
public ActionForward editBook(
 ActionMapping mapping,
 ActionForm form,
 HttpServletRequest request,
 HttpServletResponse response) {
 BookEditForm bookEditForm = (BookEditForm) form;

 /* lalinuna.de 04.11.2004
 * get id of the book from request
 */
 long id = Long.parseLong(request.getParameter("id"));

 /* lalinuna.de 04.11.2004
 * init SimulateDB class and get book by id
 */
 SimulateDB simulateDB = new SimulateDB();
 bookEditForm.setBook(simulateDB.loadBookById(id, request.getSession()));

 return mapping.findForward("showEdit");

}
The method editBook get the parameter id of the request and reads the book by id from the simulated database. The forward showEdit refres to the edit page bookEdit.jsp
/**
 * Method deleteBook
 * @param mapping
 * @param form
 * @param request
 * @param response
 * @return ActionForward
 */
public ActionForward deleteBook(
	ActionMapping mapping,
 	ActionForm form,
 	HttpServletRequest request,
 	HttpServletResponse response) {
 	BookEditForm bookEditForm = (BookEditForm) form;

 	/* lalinuna.de 04.11.2004
 	* get id of the book from request
 	*/
 	long id = Long.parseLong(request.getParameter("id"));

 	/* lalinuna.de 04.11.2004
 	* init SimulateDB class and delete book by id
 	*/
 	SimulateDB simulateDB = new SimulateDB();
 	simulateDB.deleteBookById(id, request.getSession());

 	return mapping.findForward("showList");

}
The method deleteBook get the parameter id of the request and remove the book by id from the simulated database. The forward showList refres to the book listing page bookList.jsp
/**
 * Method addBook
 * @param mapping
 * @param form
 * @param request
 * @param response
 * @return ActionForward
 */
public ActionForward addBook(
 	ActionMapping mapping,
 	ActionForm form,
 	HttpServletRequest request,
 	HttpServletResponse response) {
 	BookEditForm bookEditForm = (BookEditForm) form;

 	return mapping.findForward("showAdd");

}
The method addBook forwards on the add page bookAdd.jsp
public ActionForward saveBook(
 ActionMapping mapping,
 ActionForm form,
 HttpServletRequest request,
 HttpServletResponse response) {
 BookEditForm bookEditForm = (BookEditForm) form;

 /* lalinuna.de 22.11.2004
 * Define a new action errors
 */
 ActionErrors actionErrors = new ActionErrors();
 MessageResources messageResources = getResources(request);

 /* lalinuna.de 22.11.2004
 * check fields
 */
 if(bookEditForm.getAuthor().equals(""))
 actionErrors.add("author", new ActionError("error.field", messageResources.getMessage("label.author", request)));
 if(bookEditForm.getTitle().equals(""))
 actionErrors.add("author", new ActionError("error.field", messageResources.getMessage("label.title", request)));

 /* lalinuna.de 22.11.2004
 * check if an action error exists
 */
 if(!actionErrors.isEmpty()){
 saveErrors(request, actionErrors);
 return mapping.findForward("showEdit");
 }

 /* lalinuna.de 04.11.2004
 * init SimulateDB class and get data by id
 */
 SimulateDB simulateDB = new SimulateDB();
 simulateDB.saveToDB(bookEditForm.getBook(), request.getSession());

 return mapping.findForward("showList");
}
The last methode saveBook check if the fields author and title have valid values. If one of the field is empty an action error will filled with a message key value and saved to the request. The method forwards to the edit page, where the error is displayed. If no error occur the method forwards to the book list page.
Edit the book listing page
Open the file bookList.jsp and change the source code.
<%@ page language="java"%>
<%@ taglib uri="http://jakarta.apache.org/struts/tags-bean" prefix="bean"%>
<%@ taglib uri="http://jakarta.apache.org/struts/tags-html" prefix="html"%>
<%@ taglib uri="http://jakarta.apache.org/struts/tags-logic" prefix="logic" %>
<html>
<head>
<title><bean:message key="title.list" /></title>
</head>
<body>
<table border="1">
<tbody>
<%-- set the header --%>
<tr>
<td><bean:message key="label.author" /></td>
<td><bean:message key="label.title" /></td>
<td><bean:message key="label.available" /></td>
<td> </td>
<td> </td>
</tr>
<%-- start with an iterate over the collection books --%>
<logic:iterate name="bookListForm" property="books" id="book">
<tr>
<%-- print out the book informations --%>
<td><bean:write name="book" property="author" /></td>
<td><bean:write name="book" property="title" /></td>
<td><html:checkbox disabled="true"
name="book"
property="available"/>
</td>
<%-- print out the edit and delete link for each book --%>
<td><html:link action="bookEdit.do?do=editBook"
paramName="book"
paramProperty="id"
paramId="id">
<bean:message key="label.edit" />
</html:link>
</td>
<td><html:link action="bookEdit.do?do=deleteBook"
paramName="book"
paramProperty="id"
paramId="id">
<bean:message key="label.delete" />
</html:link>
</td>
</tr>
</logic:iterate>
<%-- end interate --%>
<%-- print out the add link --%>
<tr>
<td colspan="5">
<html:link action="bookEdit.do?do=addBook"
paramName="book"
paramProperty="id"
paramId="id">
<bean:message key="label.new" />
</html:link>
</td>
</tr>
</tbody>
</table>
</body>
</html>
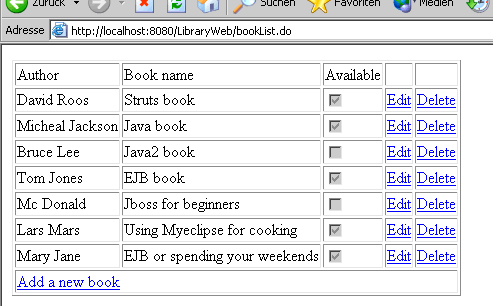
Congratulation, you have finished a simple library application with message resource keys.
Now you can test the library.
Test the application
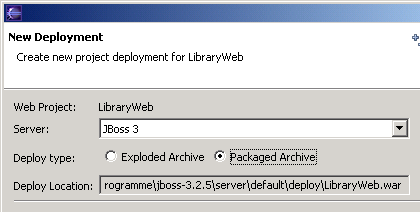
Start the jboss and deploy the project as package archiv.
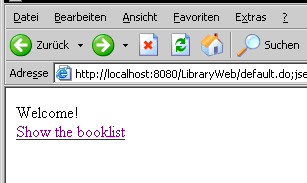
Call the project in your favorite web browser. http://localhost:8080/LibraryWeb/
Fine, thats all !!