Junit Testing Enterprise Java Beans (EJB)
This tutorial will demonstrate how to use JUnitEE to unit test an Enterprise JavaBeans.
General
Author:
Sascha Wolski
Sebastian Hennebrueder
Date:
April, 26 2005
Software:
Eclipse 3.x
MyEclipse 3.8.x
JUnitEE 1.x (http://www.junitee.org)
http://www.laliluna.de/download/junit-testing-ejb-en.pdf
Sources
http://www.laliluna.de/download/junit-testing-ejb-source.zip
What is JUnitEE ?
JUnitEE makes the JUnit framework available for J2EE applications without writing your tests as external clients to your application server. It runs directly in the application server environment as a J2EE project and provides a couple of servlets which call the normal JUnit test cases. It is not necessary to set up all the client JNDI properties, like you do if you use a external client and it comes with nice report displaying the results of running tests.
Configure the J2EE project
First you have to download the binary archive of JUnitEE.
http://sourceforge.net/project/showfiles.php?group_id=31476
Next, create a new J2EE web project JunitEJBExample (in MyEclipse choose New > Project > J2EE > Web Project).
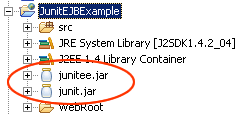
Copy the junitee.jar, you will find the the lib directory of archive, to the /WebRoot/WEB-INF/lib folder of your J2EE project.
Copy the junit.jar in the /WebRoot/WEB-INF/lib folder.
You project tree will looks like the follows:
JUnitEE provides three servlets which differ in the format of the test report they generate by default and the thread mode they use. You have to set the servlet and the servlet mapping in the web.xml of your J2EE project.
Now open your web.xml and add the following:
Using JunitEEServlet
The JunitEEServlet
            is the standard you will normally use. It generates html output by default and does not fork a new thread for test
            execution.
<?xml version="1.0"?><!DOCTYPE web-appPUBLIC "-//Sun Microsystems, Inc.//DTD Web Application 2.2//EN""http://java.sun.com/j2ee/dtds/web-app_2_2.dtd"><web-app><display-name>Unit Tester Web Application</display-name><servlet><servlet-name>JUnitEETestServlet</servlet-name><description>JUnitEE test runner</description><servlet-class>org.junitee.servlet.JUnitEEServlet</servlet-class></servlet><servlet-mapping><servlet-name>JUnitEETestServlet</servlet-name><url-pattern>/TestServlet/*</url-pattern></servlet-mapping></web-app>
Using JunitEEThreadServlet
The second servlet is the JunitEEThreadedServlet which by default forks a new thread for each test execution. For the other servlets you can get the the same behavior by using the thread parameter in the reuquest.
<?xml version="1.0"?><!DOCTYPE web-appPUBLIC "-//Sun Microsystems, Inc.//DTD Web Application 2.2//EN""http://java.sun.com/j2ee/dtds/web-app_2_2.dtd"><web-app><display-name>Unit Tester Web Application</display-name><servlet><servlet-name>JUnitEETestServlet</servlet-name><description>JUnitEE test runner</description><servlet-class>org.junitee.servlet.JUnitEEThreadedServlet</servlet-class></servlet><servlet-mapping><servlet-name>JUnitEETestServlet</servlet-name><url-pattern>/TestServlet/*</url-pattern></servlet-mapping></web-app>
JunitEEXMLServlet
The JunitEEXMLServlet
            display the test reports in the xml format. All three servlets support the
            output request parameter to override the default output. You can
            also use the
JunitEEServlet servlet to display the output in xml format.
<?xml version="1.0"?><!DOCTYPE web-appPUBLIC "-//Sun Microsystems, Inc.//DTD Web Application 2.2//EN""http://java.sun.com/j2ee/dtds/web-app_2_2.dtd"><web-app><display-name>Unit Tester Web Application</display-name><servlet><servlet-name>JUnitEETestServlet</servlet-name><description>JUnitEE test runner</description><servlet-class>org.junitee.servlet.JUnitEEXMLServlet</servlet-class></servlet><servlet-mapping><servlet-name>JUnitEETestServlet</servlet-name><url-pattern>/TestServlet/*</url-pattern></servlet-mapping></web-app>
On this point your J2EE web project is ready to use JunitEE for testing.
Create the test cases
We want to test some session bean methods of an existing EJB project. You can download the source of the LibraryEJB project at http://www.laliluna.de/...
Import the LibraryEJB project into your Eclipse workspace.
Add the EJB project to the Java-Build-Path of your J2EE test project.
(Open the project properties and choose
Java-Build-Path and the Project tab. Select the LibraryEJB project.)
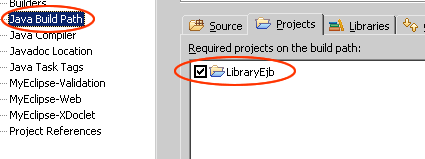
Now we have access to the classes of the LibraryEJB project within the J2EE test project.
For the next step create a new package test.laliluna.tutorial.junitejb and a new class BookSessionTest which extends from the super class TestCase of the JUnit framework.
public class BookSessionTest extends TestCase {
	....
}
Provide some protected and private variables:
public class BookSessionTest extends TestCase {

    protected BookSessionHome bookSessionHome;
    protected BookSession bookSession;
    private BookValue bookValue;
}
Override the setUp method of the TestCase class and use the default JNDI InitialContext to get a reference to the EJB. Initialize a new BookValue which we use to test if we can add a book.
public void setUp() throws Exception {
        super.setUp();

        Context context = new InitialContext();
        Object finderRef = context.lookup(BookSessionHome.JNDI_NAME);
        bookSessionHome = (BookSessionHome) PortableRemoteObject
                .narrow(finderRef, BookSessionHome.class);
        bookSession = bookSessionHome.create();


        // set a example book to add
        bookValue = new BookValue();
        bookValue.setAuthor("laliluna");
        bookValue.setTitle("JunitEE EJB Example");
        bookValue.setAvailable(new Boolean(true));
}
Override the tearDown method to reset the properties.
public void tearDown() throws Exception {
        super.tearDown();
        bookSession = null;
        bookSessionHome = null;
        bookValue = null;
}
testSaveBook
The first test scenario tests if there are problems while adding a new book with the EJB session method saveBook. First have a look to the session method to know whats going on there.
Create a new method testSaveBook. Within the method you call the method saveBook of the session bean BookSession with the additional parameter bookValue, which represent a new book.
Catch all exception thrown by the method saveBook and use the fail method to output the exception message. If something goes wrong, for example the table where the book will be added is not there, you will see it later in the test report.
public void testSaveBook() {
    	try{
    	    bookSession.saveBook(this.bookValue);
    	} catch(Exception e){
    	    fail("Received Exception: "
    	         + e.getClass()
                 + " : " + e.getMessage());
    	}
}
testGetAllBooks
In the next scenario we want to test if we can get all books from the session bean. So first have a look to the method getAllBooks of the session bean BookSession in the EJB project to know what happens there.
Create a new method testGetAllBooks. Do the same as before, catch all exceptions thrown by the method and output the error message with the fail method. Furthermore use the method assertNotNull to test if the collection returned by the method getAllBooks is not null.
public void testGetAllBooks() {
        try {
            assertNotNull(bookSession.getAllBooks());
        } catch (Exception e) {
            fail("Received Exception: "
                 + e.getClass()
                 + " : " + e.getMessage());
        }
}
Run the tests
Now we want to run the tests in the JUnitEE servlet container. There are two modes possible the Basic Test Mode and the Smart Mode. In the basic test mode you have to create a web application to choose your test. In the smart mode you can specify jar files which will be searched for tests or you can add a text file containing the tests.
If you have a jar file which contains the test classes you have to initialize a parameter
searchResources within the servlet element of the application configuration file web.xml.
You may also tell JUnitEE to search more than one jar file for your tests. In this case the parameter value is a comma-separated list.
<servlet><servlet-name>JUnitEETestServlet</servlet-name><description>JUnitEE test runner</description><servlet-class>org.junitee.servlet.JUnitEEServlet</servlet-class><init-param><param-name>searchResources</param-name><param-value>test.jar, test2.jar</param-value></init-param></servlet>
In our example we use no jar package, so you have to create a file which holds a list of test classes. Create a new file testCase.txt in the directory /WebRoot/WEB-INF and add the following lines:
# Test cases which can be run
test.laliluna.tutorial.junitejb.BookSessionTest
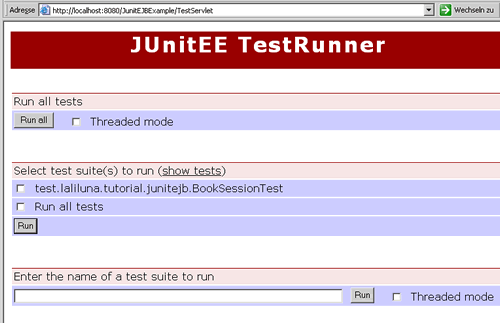
Now you can deploy the JUnitEE project, but make sure you have deployed the EJB project before. After deploying the JUnitEE project you can call it in your favorite browser.
For our example use the following link:
http://localhost:8080/JunitEJBExample/TestServlet
You will find a dialog where you can choose which test classes you want to execute.
That's all, we hope we could make you understand creating test cases for your EJB project.