JSF 2 – evaluation and test
Introduction
JSF is a standard to implement Java based web framework. There is
a reference implementation of the standard, Mojarra JSF, which
provides the request processing and a set of basic components. JSF is
component oriented and as such it brings the concepts of desktop
application development to web application.
JSF 2 introduces a number of new features. It provides a
standardized mechanism to support Ajax, input validation using
annotations (JSR 303), facelets as default rendering engine and a
couple of more features required by modern web application.
The standard implementation does only provide basic components
which mirror the standard HTML input components but one idea of the
standard is that other companies can provide component libraries with
advanced widgets like trees, grids etc. There are a number of third
party component libraries like ADF Faces, Trinidad, ICEFaces,
PrimeFaces, RichFaces, NetAdvantage, JViews and many others.
We have tested a snapshot of 2.0.0 of the reference implementation
(Mojarra) which is released under the Common Development and
Distribution License (CDDL) + GPLv2 and JSF is open source. This
version is of course not yet stable, but I will friendly overlook the
existing bugs in this evaluation.
The test took place from July to
November 2009.
Website <https://javaserverfaces.dev.java.net/>
The tester are Holger Brade, independent software developer at
Munich, Germany and me, Sebastian Hennebrueder, independent software
developer and trainer for Hibernate and JPA at Frankfurt, Germany.
Tools
I used Visual Paradigm to create the sequence diagrams. It is a quite powerful UML solution with support for Java round trip engineering. It detects JPA and Hibernate entities as well. <http://www.visual-paradigm.com/>
Table of Content
- 1 Introduction 1
- 2 Hello world 2
- 3 Discussion 5
- 3.1 Architecture 5
- 3.2 Dependencies and libraries 17
- 3.3 Flow of development 17
- 3.4 Popularity and contributor distribution 17
- 3.5 Sebastian’s opinion on the framework 17
- 3.6 Holger’s opinion 22
- 3.7 The community’s opinion – beautiful features and concepts 23
- 4 Features 23
- 4.1 Render / page technologies 23
- 4.2 Developer comfort 23
- 4.3 Ajax support 24
- 4.4 Security 25
- 5 How do I do …? 26
- 5.1 Navigation 26
- 5.2 Friendly URLs 29
- 5.3 Templates 32
- 5.4 Forms and validation 33
- 5.5 Common dialog tasks 40
- 5.6 Message resources and internationalization 43
- 5.7 Exception handling 45
- 5.8 Redirect on post and flash scope 47
- 5.9 Conversation context, wizards and workflows 47
- 5.10 Double submit handling 52
- 5.11 Custom components 52
- 6 Performance and scalability 61
Hello world
The hello world application intends to show how complex it is to
setup a simple application. It renders an index page with a link.
Following the link calls an action of the framework and stores a
localized message. The user is send to a view displaying this
message.
You can download the sample project helloworld at
<http://www.laliluna.de/download/framework-evaluation-samples.zip>
Requirements:
A servlet engine or an JEE application server like Jetty, Tomcat
or Glassfish. The example was successfully tested with Jetty 6.21,
Tomcat 6.0.14 and Glassfish v3-preview.
Required steps
Create a new web application.
Add the following libraries to the build path of the web
application.
- jsf-api-2.0.0-SNAPSHOT.jar
- jsf-impl-2.0.0-SNAPSHOT .jar
- jstl 1.2 (might be removed)
The deployment approach for JSF libraries is slightly picky.
Glassfish provides already JSF 2 libraries. You may need to update
them using the update mechanism of Glassfish. Just search for
‘glassfish JSF2’ to find more information.
Jetty 6 requires that the libraries are copied to
JETTY_HOME/lib/ext/ You may create a subdirectory as well. Sample:
JETTY_HOME/lib/ext/jsf-2.x/
Tomcat 6 is fine, if you deploy the libraries with your web
application. They can be added to the WEB-INF/lib folder of the
deployed WAR archive.
You have to provide the JSTL library even if you don’t use it.
Modify the web.xml
The Servlet class FacesServlet starts the JSF request processing
life cycle and must be defined in the web.xml. The servlet mapping
tag defines the for which URL the FacesServlet should be executed.
The pattern /faces/* is commonly used by the JSF specification but
any other prefix or extension is possible. The example uses as
web-app attribute version=“2.5” this means we are using
servlet-api version 2.5. If you use tomcat 6 we need minimum
servlet-api in version 2.5. Compared with jsf 1.2 nothing changed in
this example.
Below you can see the web.xml
<?xml version="1.0" encoding="UTF-8"?>
<web-app xmlns="http://java.sun.com/xml/ns/javaee"
xmlns:xsi="http://www.w3.org/2001/XMLSchema-instance"
xsi:schemaLocation="http://java.sun.com/xml/ns/javaee web-app_2_5.xsd"
version="2.5">
  <context-param>
    <param-name>javax.faces.STATE_SAVING_METHOD</param-name>
    <param-value>client</param-value>
  </context-param>
<display-name>HelloWorld with JSF RI 2 (Beta 2)</display-name>
<servlet>
<display-name>FacesServlet</display-name>
<servlet-name>FacesServlet</servlet-name>
<servlet-class>javax.faces.webapp.FacesServlet</servlet-class>
<load-on-startup>1</load-on-startup>
</servlet>
<servlet-mapping>
<servlet-name>FacesServlet</servlet-name>
<url-pattern>/faces/*</url-pattern>
</servlet-mapping>
</web-app>
Create a resource file
The resource bundle for messages is stored in the file
message.properties in the java package
de.laliluna.examples.jsf2.
Add a message for the key hello_world.
hello.world=Hello world
We want to make the resource messages available in the pages.
Therefor we need to configure it in the faces-config.xml. The
file is located in webRoot/WEB-INF/faces-config.xml. In
addition to the resource bundle, we need to specify which locales are
supported. If you don’t specify the locales, then a user with a
different locale than yours might see a ‘Resource bundle not found’
exception.
<?xml version='1.0' encoding='UTF-8'?>
<faces-config xmlns="http://java.sun.com/xml/ns/javaee"
    xmlns:xsi="http://www.w3.org/2001/XMLSchema-instance"
    xsi:schemaLocation="http://java.sun.com/xml/ns/javaee http://java.sun.com/xml/ns/javaee/web-facesconfig_2_0.xsd"
    version="2.0">
  <application>
    <locale-config>
      <default-locale>en</default-locale>
      <supported-locale>de</supported-locale>
      <supported-locale>en</supported-locale>
    </locale-config>
    <resource-bundle>
      <base-name>de.laliluna.examples.jsf2.message</base-name>
      <var>m</var>
    </resource-bundle>
  </application>
</faces-config>
Navigation
In JSF 1.2 navigation rules were explicitly defined in the
faces-config.xml. In JSF 2 we have an alternative: the implicit
navigation. An outcome value like ‘response’ is automatically mapped
to the file /response.xhtml.
The hello.xhtml is the first page we see. It displays a link
<?xml version="1.0" encoding="UTF-8"?>
<html xmlns="http://www.w3.org/1999/xhtml" lang="en"
xmlns:h="http://java.sun.com/jsf/html"
xmlns:f="http://java.sun.com/jsf/core"
xmlns:ui="http://java.sun.com/jsf/facelets">
<head>
<title>Simple JSF 2 example (start)</title>
</head>
<body>
<h:form id="form">
<h:commandLink action="#{sampleBean.storeMessage}">Go to hello world</h:commandLink>
</h:form>
</body>
</html>
The input form is posted and the action storeMessage of the
class SampleBean is executed. It stores the message and
returns the outcome ‘response’. JSF will render the page
response.xhtml.
@ManagedBean
public class SampleBean {
  private String message;
  public String storeMessage(){
    FacesContext context = FacesContext.getCurrentInstance();
    ResourceBundle bundle = context.getApplication().getResourceBundle(context, "m");
    message = bundle.getString("hello_world");
    return "response";
  }
  public String getMessage() {
    return message;
  }
}
The response.xhtml looks like
<?xml version="1.0" encoding="UTF-8"?>
<!DOCTYPE html PUBLIC "-//W3C//DTD XHTML 1.0 Transitional//EN"
"http://www.w3.org/TR/xhtml1/DTD/xhtml1-transitional.dtd">
<html xmlns="http://www.w3.org/1999/xhtml"
  xmlns:h="http://java.sun.com/jsf/html"
  xmlns:f="http://java.sun.com/jsf/core">
<head>
  <title>Simple JSF 2 example (response)</title>
</head>
<body>
  Message: #{sampleBean.message}
</body>
</html>
That’s it.
Discussion
Architecture
Components
JSF is a component oriented framework. A page or better a view (to
use the JSF terminology) doesn’t consist of text but of components.
Below you can see a sample view.
<?xml version='1.0' encoding='UTF-8' ?>
<!DOCTYPE html PUBLIC "-//W3C//DTD XHTML 1.0 Transitional//EN"
 "http://www.w3.org/TR/xhtml1/DTD/xhtml1-transitional.dtd">
<html xmlns="http://www.w3.org/1999/"
    xmlns:ui="http://java.sun.com/jsf/facelets"
    xmlns:h="http://java.sun.com/jsf/html"
    xmlns:l="http://www.laliluna.de/components/sample">
<head>
  <meta http-equiv="Content-Type" content="text/html; charset=UTF-8" />
  <title>Facelets - Template Example</title>
</head>
<body>
  <div><l:hello /></div>
  <h:form>
    <h:inputText value="#{inputBean.text}"/>
    <h:commandButton actionListener="#{inputBean.logText}" value="Send" />
  </h:form>
</body>
</html>
The view is parsed and a tree of components is created. Below you can
see a simple component tree.
javax.faces.component.UIViewRoot
- com.sun.faces.facelets.compiler.UIInstructions
- com.sun.faces.facelets.compiler.UIInstructions
- de.laliluna.howto.components.MyHelloComponent
- com.sun.faces.facelets.compiler.UIInstructions
- javax.faces.component.html.HtmlForm
-- javax.faces.component.html.HtmlInputText
-- javax.faces.component.html.HtmlCommandButton
- com.sun.faces.facelets.compiler.UIInstructions
Every component extends UIComponent. To be more precise in JSF 2 it
is recommended to extend UIComponentBase which extends UIComponent
and provides a number of utility methods. When the view is rendered,
JSF asks the root component to render itself, which in return will
ask all of its child components to render themselves. The whole tree
is traversed to render the response. You will find more details on
the rendering later in this article.
Behaviours for components
JSF 2 introduces the concept of
behaviours. You may think of the ‘Strategy pattern’, which separates
behaviour from a class and allows to interchange the behaviour
afterwards. In JSF 1.x existed a kind of behaviour as well. You can
add a converter or a validator to a input field.
Sample for input field which expects a
date and convert the input value to an instance of the class Date.
 <h:inputText value="#{inputBean.moved}">
  <f:convertDateTime dateStyle="short" type="date"/>
</h:inputText>
The concept is now improved with a more neutral named ClientBehavior
interface. The idea is to add client side JavaScript and JavaScript
to a component. This allows to transform a input field to an
autocomplete field or a calendar input.
Lifecycle
The processing of a request is called lifecycle in JSF. There are
different phases which are executed one after the other. If you
prefer design pattern terminology it is a ‘Chain of responsibilities.
A simple GET request has a shorter lifecycle. It the GET fetches a
CSS, JavaScript, image or other content which is provided as a
resource (see resource handling later in this article), then the data
is immediately delivered.
If the request is for a facelet which doesn’t have any parameters,
then two phases are needed as shown in the following diagram.
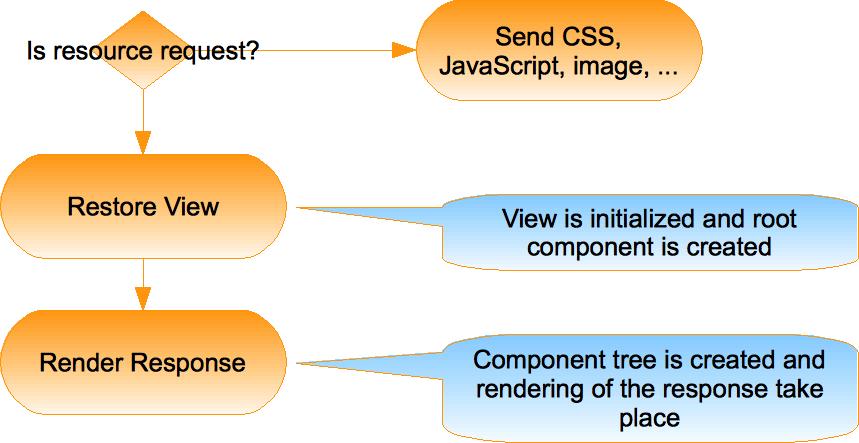
Before and after every phase events are created to allow event
listener to execute. We will have a closer look at events later.
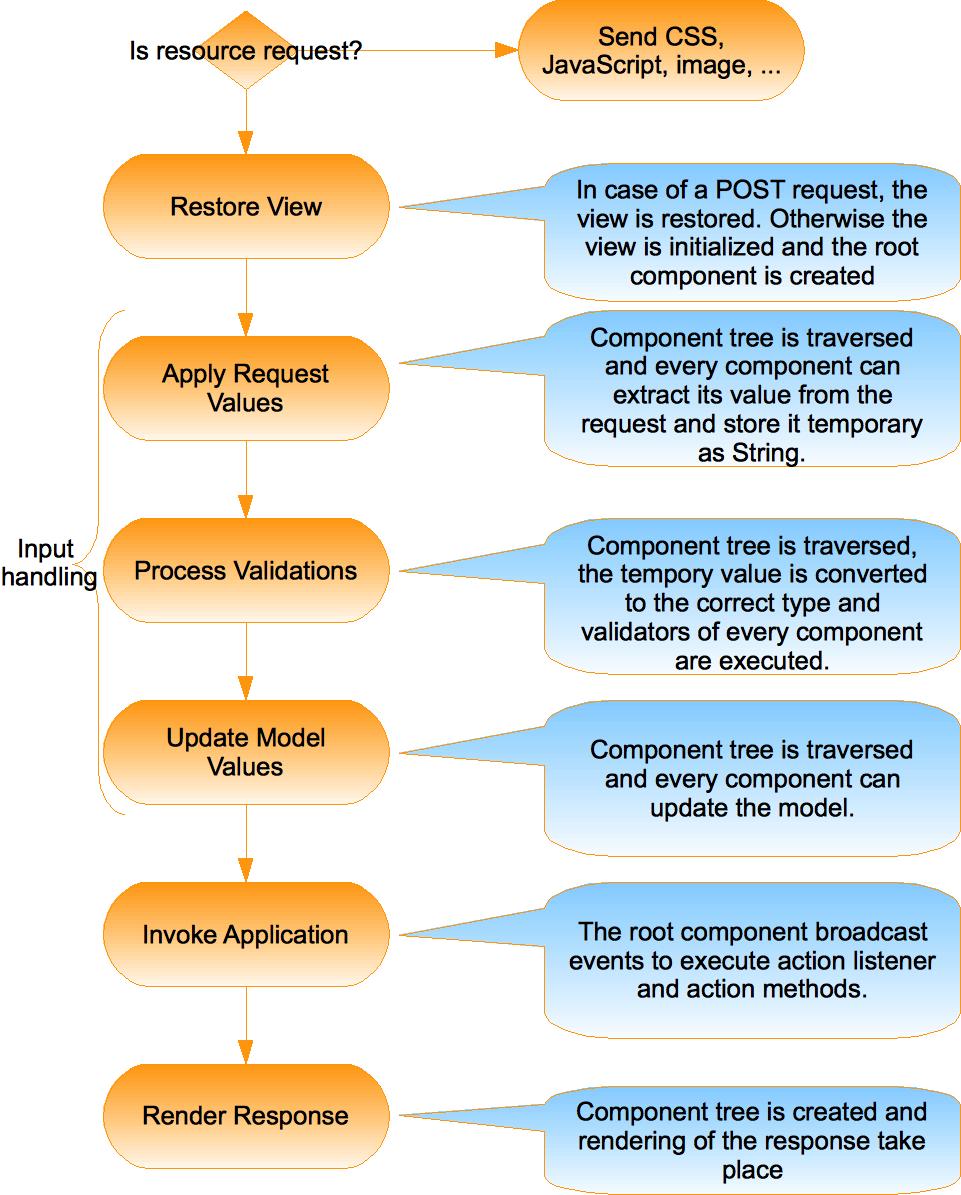
The lifecycle of a GET request with parameter or of a POST request
has a number of more phases, which either deal with input parsing,
converting and validating or with calling of action and action
listener. You can find the diagram below.
There are three phases which deal with input handling:
- Apply Request Values
- Process Validations
- Update Model Values
A component which does not expect any input will do nothing during
this phases. But a component which expects input will extract the
value from the request during the Apply Request Values Phase
and store it as String value. If the validations for the input
value fails in the validation phase, then this extracted value will
be redisplayed.
In the Process Validations Phase the submitted value is
converted from String to the expected type. Than all validators are
executed. If a validation fails, the processing is stopped after the
validation phase and the processing continues with the Render
Response Phase. If the validation was successful the processing
continues with the Update Model Values Phase.
In the Update Model Values Phase the model is updated. For
example the input text field
<h:inputText value="#{inputBean.text}"/>
will update the field text of the managed bean inputBean.
JSF offers a base class to be used for components which expects
user input: UIInput.
The phase Invoke Application will
broadcast the InvokeApplication event. This means that the
action listener and the action methods are called. Action listener
are called first. The following command link will call the action
listener foo and the action method bar. The difference
between the two is that the action method can influence the
navigation flow. It returns a String which represents an navigation
outcome.
<h:form>
  <h:commandButton actionListener="#{aBean.foo}" action="#{aBean.bar}" value="Send"/>
</h:form>
The following picture shows the complete lifecycle of JSF.
Every phase can set the boolean flags
renderResponse or responseComplete. RenderResponse will
short circuit to the Render Response Phase. ResponseComplete
stops the processing completely. The renderResponse flag is
for example used during the Validation Phase in case the
validation failed.
Facelets support now partial view rendering for an Ajax request. If
the Ajax request asks only to re-render a specific component, then an
extract of the component tree can go through the lifecycle and render
itself.
Site note: There are different options
to short circuit the processing with immediate attributes for buttons
and links. I don’t want to detail this in this short introduction.
Restoring and saving state
Restoring and saving state is actually part of the lifecycle but
it is slightly complex and I would like to explain it in more detail.
A component can save its state. State includes for example the
value of attributes. The next request can restore the state. For
example, a table component can store the rows, columns and the
selected rows. The next POST request will restore the state and now
you can easily detect if the selected row has changed. The state is a
snapshot of the component tree taken after the response was rendered.
The state can be stored on the client as hidden field, which is
automatically added to all forms or alternatively on the server in
the user session. The first approach has the advantage that no memory
is consumed on the server but the amount of data send around with a
form submit will increase. The length of the hidden field value grows
with the amount of saved state.
Using JSP as rendering technology follows the approach of JSF 1.x
which stores the full component tree. Facelets follows a different
approach. It creates the component tree from the template and then
applies the saved state to the component tree. This approach is
called partial state saving. The size of this partial state is a lot
smaller as compared to full state saving. The tradeoff is that the
restoring of the state takes longer.
The chapter which explains how to write a component, explains how
to implement partial state saving.
Events
From a conceptual point of view, JSF looks like a desktop
application. There are components and events. Components can create
events and can react (or listen) to events. The event concept of JSF
is not simple because there are a lot of different events and there
are a lot of places where events are actually created.
I will try to make this chapter the simplest guide to JSF events.
There are three types of events:
- System events
- Phase events
- Application events.
System and phase events are both created by JSF independent of
your application.
Phase events
Phase events are coarse grained. They are broadcasted before and
after every phase. A use case for a listener of a phase event is for
example a security framework. You can use phase listener to check
access before a phase is entered. A phase listener can stop the
lifecycle processing by setting the flags renderResponse or
responseComplete . Both have been explained in the lifecycle
paragraph.
You can register global phase event listener and per view phase
event listener. Global phase listener are executed for all requests
whereas per view listener only for a request of the specific view.
Here is an example for a global phase event listener. It is
configured in the faces-config.xml.
 <faces-config ...>
  ...
  <lifecycle>
    <phase-listener>
      de.laliluna.howto.services.GlobalPhaseListener
    </phase-listener>
  </lifecycle>
You can add global phase listener programmatically as well. The Lifecycle provides methods to add and remove phase listeners.
LifecycleFactory lifecycleFactory = (LifecycleFactory)
FactoryFinder.getFactory(FactoryFinder.LIFECYCLE_FACTORY);
Lifecycle lifecycle =
    lifecycleFactory.getLifecycle(LifecycleFactory.DEFAULT_LIFECYCLE);
lifecycle.addPhaseListener(new GlobalPhaseListener());
Phase listener can be added per view as well. Just add the following
tag to the page.
<f:phaseListener type="de.laliluna.howto.services.PerViewPhaseListener" />
Alternatively you can add such a listener programmatically. You need
to extract the root component from the FacesContext and call addPhaseListener
viewRoot.addPhaseListener(listener);
There are two limitations for view specific phase listener. First, as
the view needs to be created for a per view phase listener, you
cannot get any events for the RestoreViewPhase . Second, a GET
request to a page, which expects parameters, does only trigger the
RenderResponse phase events.
A phase listener is just a class implementing the PhaseListener
interface. The method getPhaseId returns a value which
specifies in which phase the listener is called.
package de.laliluna.howto.services;
import javax.faces.event.PhaseEvent;
import javax.faces.event.PhaseId;
import javax.faces.event.PhaseListener;
public class PerViewPhaseListener  implements PhaseListener {
  private Logger logger = Logger.getLogger(PerViewPhaseListener.class.getName());
  public void afterPhase(PhaseEvent event) {
    logger.info("per view phase listener, after: "+event.getPhaseId());
  }
  public void beforePhase(PhaseEvent event) {
    logger.info("per view phase listener, before: "+event.getPhaseId());
  }
  public PhaseId getPhaseId() {
    return PhaseId.ANY_PHASE;
  }
}
System events
System events is an innovation of JSF 2. Those events are created
at various moments of application or request lifetime.
There are system events which are global and others which are
related to a component. Event listener can be configured in the
faces-config.xml, programmatically or using annotations.
In the following sample you can see an event listener, which is
called after the application has started and JSF finished the
configuration, and an event which is executed before the application
is shutdown.
 <faces-config ...>
  <application>
    <system-event-listener>
      <system-event-listener-class>
          de.laliluna.howto.services.StartUpConfiguration
      </system-event-listener-class>
      <system-event-class>
          javax.faces.event.PostConstructApplicationEvent
      </system-event-class>
    </system-event-listener>
    <system-event-listener>
      <system-event-listener-class>
          de.laliluna.howto.services.StartUpConfiguration
      </system-event-listener-class>
      <system-event-class>
          javax.faces.event.PreDestroyApplicationEvent
      </system-event-class>
    </system-event-listener>
  </application>
An example to register a system event listener programmatically:
Application application = FacesContext.getCurrentInstance().getApplication();
application.subscribeToEvent(PreRenderViewEvent.class, new MySystemEventListener());
For components and renderer the system event listener can be
registered using annotations as well:
@ListenerFor(systemEventClass = PreRenderViewEvent.class)
A final option is to configure the event listener inside of the
template. The <f:viewParam> is a component which writes
a request parameter into a managed bean variable. The *preRenderView
- event will trigger execution of the load method, which will load
an article for the given id.
<f:metadata>
 <f:viewParam id="id" name="id" value="#{articleBean.id}"/>
 <f:event type="preRenderView" listener="#{articleBean.load}"/>
</f:metadata>
There are about 16 different system
events. You can easily find them by looking for sub classes of
javax.faces.event.SystemEvent .
System event listener are fine grained
compared to Phase listener. Some are related to new features of JSF 2
(sample: PreDestroyCustomScopeEvent ), some let you control
behavior of your components.
Application events
Application events are created by your components. JSF 1.x had two
types of FacesEvents:
- ValueChangeEvent
- ActionEvent
The event ActionEvent is used by the component class
UICommand , which is the base class for the command link,
command button etc. The event is queued during the ApplyRequestValue
phase. Later in the InvokeApplication phase, the events are
broadcasted and action methods and listener are executed.
The event ValueChangeEvent is queued, if the validation of
user input was successful and the value has changed. It is
broadcasted during all following phases.
JSF 2 add events related to behaviors and Ajax ( BehaviorEvent,
AjaxBehaviorEvent). Both events are used in the new component
behavior concept. The concept allows to add behavior to existing
components. An input field may offer autocomplete values or react to
the browsers onBlur event.
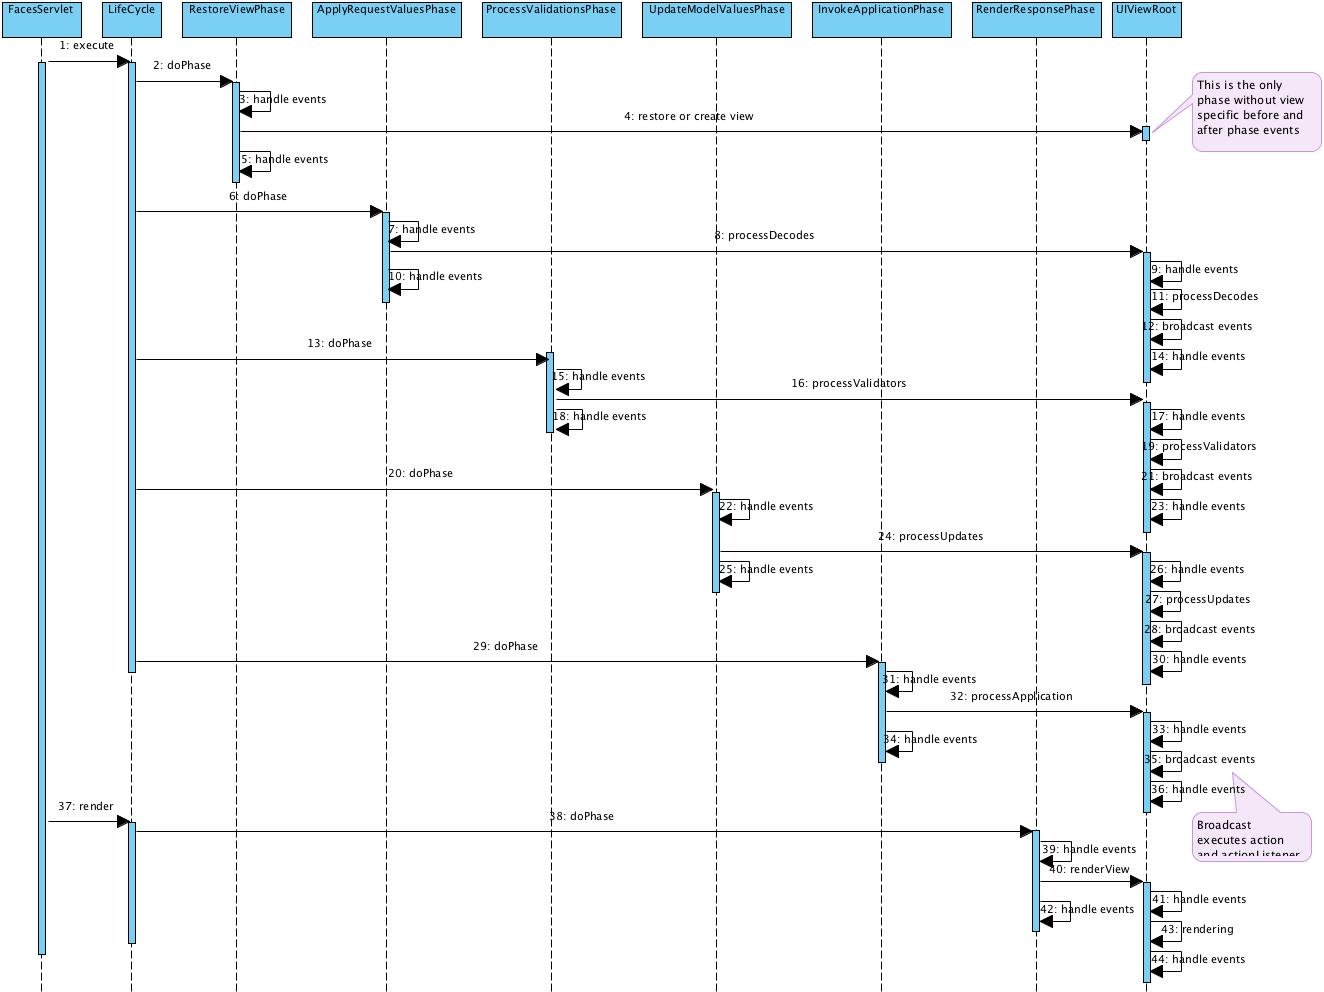
Technical details
The following diagram shows all places where events listener are
called. The diagram is slightly simplified. The FacesServlet is the
entry point of the JSF application. It calls the lifecycle, which in
return executes the different phases. Every phase calls global phase
event listener before and after the actual work is done. Sample: 3
and 4 in the RestoreView phase.
PhaseEvent listener can be defined per view as well. These
listener are called by the root component, UIViewRoot. This happens
in the diagram for example at 9 and 14.
FaceEvents (alias Application events) are broadcasted by the
UIViewRoot component. This happens in every phase. Sample: 12, 21,
28.
System events are broadcasted immediately at various points in
JSF. Just search the source code for publishEvent.
An interesting point of event broadcasting is number 35. The event
broadcasting will as well call all action listener and action
methods.
Managed Beans
Managed Bean are the key player in your web application. They can
receive input values, provide data for output and provide action
listener and action methods. Action methods can influence the
navigation where as action listener cannot. In most applications
managed bean are the bridge between the web application and the
business logic.
Managed Beans are managed by JSF. They are instantiated and stored
in a context. There are different contexts. JSF calls them scopes:
Session, Request, View, etc.
The following is an example for a managed bean with session scope.
It increments a counter showing how often it was called during the
current user session.
package de.laliluna.howto.beans;
import javax.faces.bean.ManagedBean;
import javax.faces.bean.SessionScoped;
import java.util.concurrent.atomic.AtomicInteger;
@ManagedBean
@SessionScoped
public class SessionScopeSample {
  private AtomicInteger count = new AtomicInteger();
  public int getCount() {
    return count.getAndAdd(1);
  }
}
The template contains the following code
In the user session, you have called ‘getCounter’ of the SessionScopeSample bean #{sessionScopeSample.counter} times.
The first time, you visit the page an instance of SessionScopeSample is created and stored in the session scope. In
subsequent calls JSF gets the instance from the session scope and
reuse it.
Scopes are Application, Session, View, Request and None.
None will create a new managed bean every time it
is used. The View scope lifecycle is started when entering a view
with a GET request. If you reload the page a new view scope is
started. If you send a POST request the old view is restored and the
view scope is reused. The view scope is destroyed if an action method
sends you to another view.
At the time of writing it was unclear
what happens if you leave the page with a GET request without a call
to an action method. The other scopes correspond to their servlet
spec equivalents.
Very interesting are custom scopes.
This is a new feature of JSF 2 and let you build for example a wizard
scope to be used, if you want to build your own dialog wizard or a
scope to integrate a business process engine.
Managed beans can be configured using
annotations and XML in the faces-config.xml .
Another feature of managed beans is
configuration of a managed bean. You can set properties to values or
inject other managed beans. You can only inject beans with a longer
lifetime into another managed bean. Managed beans are in fact a
simple form of an Inversion of Control container.
 @ManagedBean @RequestScoped
 public class RequestScopeSample {

  @ManagedProperty("foo is foo")
  private String foo;

  @ManagedProperty("#{viewScopeSample}")
  private ViewScopeSample viewScopeSample;
   // setters are omitted here for brevity BUT are REQUIRED for injection
 }
If you use JSF inside of a JEE container you can inject resources,
session and message driven beans and webservices into your managed
beans.
A final feature of managed beans are
listeners to lifecycle events. You can react to the creation and the
destruction of a managed bean.
 public class RequestScopeSample {
  @PostConstruct
  public void postCreate(){
    logger.info("RequestScopeSample bean is created");
  }
  @PreDestroy
  public void preDestroy(){
    logger.info("RequestScopeSample bean is destroyed");
  }
}
Extension points
JSF offers a variety of extension points. The most important
extension points are the classes
javax.faces.application.Application and javax.faces.FactoryFinder,
phase listener and custom component.
The Application class is a central class in JSF. It
provides access to most information of an JSF application, for
example: resource bundles, navigation handler, action listener,
supported locales etc. There is only a single instance per
application. It can be configured by entries inside of the
<application/> tag in the faces-config.xml. The chapter
User-friendly URLs contains an example
The Application class and mainly everything else in JSF is
created by factories.
Factories can be located by a factory finder.
The FactoryFinder class is a final class which provides access
to about 10 different factories. Every factory can be replaced with a
custom factory. The configuration takes place inside of the
<factory..> tag in the faces-config.xml .
Factories create for example the FacesContext, a class holding all
information relevant to a request. In addition there is an exception
handler factory, which allows to customize the exception handling
(see chapter exception handling), there is a lifecycle factory which
allows to customize the creation of the JSF lifecycle.
Phase listener is another option to integrate customized
functionality in JSF. It can be used to integrate code that is
executed before and/or after a specific phase.
The final option are custom components. Components are elements
used in templates. There are visual components displaying for example
input forms and fields and non visual components, which are used to
configure validation methods, view parameters or view specific event
listener.
How to integrate a business layer?
We have discussed already that Managed Beans are the bridge
between a JSF application and the business logic.
The simplest way to access your business services is to implement
a ServiceFactory which creates your business services.
@ManagedBean @RequestScoped
public class ArticleBean {
// ...
  public void load(){
    if(id == null)
      return;
    ServiceFactory factory = ServiceFactoryImp.getInstance();
    ArticleService articleService = factory.getService(ArticleService.class);
    article = articleService.findById(id);
  }
}
This approach is not very comfortable. It would be a lot nicer, if we
can inject a service using an annotation.
  @ManagedProperty(value = "#{articleService}")
// or like this: @Inject
  private ArticleService articleService;

  public void load(){
    if(id == null)
      return;
    article = articleService.findById(id);
  }
The good message: If you use EJB 3 and implement your business logic
using session beans, then the problem is already solved. You can
inject sessions beans using the @EJB annotation.
How do we solve this for Inversion of Control / Dependency
Injection Frameworks like Google Guice, Hivemind, Pico Container or
the Spring framework? The approach is pretty much the same for all
frameworks. We just need to provide our own
expression-language-resolver. The resolver finds and creates objects
referenced in EL-expressions like #{articleService}. Google
Guice and the Spring Framework already provide a resolver. In order
to show all required steps, I will not use one of those finished
solutions but show the integration of the Framework Pico Container.
A quick site note on EL resolution:
An EL-resolver provides a method getValue(ELContext elContext,
Object base, Object property) to resolve an expression. An
expression like #{foo.bar.baz} is split into its parts and
resolved step by step. GetValue is first called for the
property foo with a base value of null. If foo resolves to an object, then the method is called with this object
as base value and bar as property value. In the last step, the
resolved value of bar is used as base value and baz as
property value.
Now, let’s create our own resolver. First, we need to tell JSF
that it should add our resolver in addition to the default resolvers.
Add the resolver to the faces-config.xml .
 <faces-config ...>
  <application>
  <el-resolver>de.laliluna.howto.application.PicoBeanELResolver</el-resolver>
  ...
Then you need to implement your own resolver. It must extend the
class javax.el.ELResolver. There are 6 methods to override.
The following four are important.
- getValue – is called when a property is resolved
- setValue – is called when a value is assigned to an expression, a Inversion-Of-Control container will not allow this in
most cases - isReadOnly – returns true, if a resolved value is read
only. As resolved business services are read only, we return true,
if we can resolve a bean - getType – is called before setValue is called. It
returns the type which can be assigned to an expression. We need to
implement it but it is in fact never used, as we support only read
only values.
Here is an extract of the source code
package de.laliluna.howto.application;
import de.laliluna.howto.services.PicoObjectProvider;
import org.apache.log4j.Logger;
import javax.el.ELContext;
import javax.el.ELResolver;
import javax.el.PropertyNotFoundException;
import javax.el.PropertyNotWritableException;
import java.beans.FeatureDescriptor;
import java.util.Iterator;

public class PicoBeanELResolver extends ELResolver {
  private static Logger logger = Logger.getLogger(PicoBeanELResolver.class);

  public PicoBeanELResolver() {
    // init the Picocontainer
//    It is better to add a startup listener instead of doing this here !!!!
    PicoObjectProvider.getInstance().startUp();
  }

  public Object getValue(ELContext elContext, Object base, Object property) {
    // the resolver resolves only names without prefix.
    if (base != null) {
      return null;
    }
    if (property == null) {
      throw new PropertyNotFoundException("Could not resolve property, as property name is null");
    }
    PicoObjectProvider provider = PicoObjectProvider.getInstance();
    Object result = provider.provide(property.toString());
    if (result != null) {
      elContext.setPropertyResolved(true);
    }
    return result;
  }

  public Class<?> getType(ELContext elContext, Object base, Object property) {
    Object value = getValue(elContext, base, property);
    return value != null ? value.getClass() : null;
  }

  public void setValue(ELContext elContext, Object base, Object property, Object val) {
    Object value = getValue(elContext, base, property);
    if (value != null) { // should never happen, as readonly returns true
      throw new PropertyNotWritableException("Objects resolved by the Pico Container are not writable");
    }
  }
  public boolean isReadOnly(ELContext elContext, Object base, Object property) {
    return getValue(elContext, base, property) != null;
  }
// ...
That’s it.
An alternative approach to managed bean is to create the managed
bean already by the Inversion of Control Framework. This approach is
used by the Spring Framework or the Web Beans JSR. The advantage is
that the managed bean can be a part of the lifecycle of the IOC
container and integration of advanced scopes like wizards, workflows
etc are simpler. A disadvantage of such an approach is that the web
and the business layers start to flow into each other and make it
harder to test the business layer independently.
Dependencies and libraries
JSF 2 requires only 3 libraries
- JSF API
- JSF implementation
- JSTL 1.2
You need JSTL even if you use only facelets.
The ‘Hello World’ example stated some application server specific
deployment requirements.
If you want to use Bean Validation (see below), then you
will need the two additional JARS.
If you use a component library like MyFaces, ADF, Richfaces,
Icefaces etc then you will need those additional libraries.
Flow of development
Building a new dialog normally requires a new facelet page to be
created, a new managed bean and in some cases a new navigation rule
in the faces-config.xml. Most
changes requires a reload of the application. Exception to the rule
are facelets page changes, and changes inside of a Java class method.
You can improve the development speed by using Groovy instead of Java
to implement components and managed beans. Have a look at the groovy
chapter of this article.
Popularity and contributor distribution
Google pages on JSF 2: about 7,000,000
Books: Currently none but there are
quite some books in preparation
Number of mails on mailing list per
month: 750 (as JSF is only a standard and Mojarra is only one
implementation, this is not the number of all discussions on JSF.
Every component collection has its own website.)
Number of core developer, regular
patcher/contributors
The numbers are hard to estimate and
probably less informative as the JSF landscape will have a number of
JSF implementation, including the reference implementation of JSF
(Mojarra) and a number of component collections. Apart from MyFaces
most component collections are backed by a single company.
Sebastian’s opinion on the framework
There is light and there is shadow. JSF 2 is a major step forward
in quite a number of areas. Navigation with GET requests is now
possible and implicit navigation as well. Implicit means that you
don’t have to create navigation rules in an XML file as before but
you can just return a string from an action method like ‘result’ and
you will navigate to the page result.xhtml .
Facelets are now the default mechanism to create pages. A facelet
page is written in xhtml format. Facelets provide a quite flexible
template model and renders faster as compared to JSP based pages. An
additional advantage is the ease to integrate custom components. You
just include the namespace of your component taglibrary and you get
autocompletion for your own components, if your IDE supports it.
The approach to handle resources like CSS, JavaScript or images is
a great feature as well. The resources are packaged into a directory
structure, which may include a locale or a version prefix like
de/css/test.css/1.1.css. This approach allows to deliver
different CSS, JavaScript or images for specific locales and in
addition you can managed different versions of a file as well. Per
default the newest version is delivered but you may define for a page
that an older version is used. I am not aware of a framework
providing the same flexibility for resource handling.
Finally, the code is very easy to understand and nice to read. The
Mojarra implementation is written by people, who knows how to code.
Let’s have a look a the dark sides.
Overall impression
JSF looks like an old castle, where every generation added pieces,
towers and buildings. I don’t blame the developers for this, as the
code shows, that they know how to do a proper job. I believe that the
reason for the current status of JSF is that the features are defined
by a specification. The specification is industry driven with a focus
on being backward compatible instead of being technology driven.
Everything works somehow but always rather complex than simple. Every
release makes it worse as nothing is dropped. I am sorry, but I can
only see a bad ending for such a strategy.
Pages are extremely verbose. Using it make you feel being
unproductive most of the time. JSF 2 brings some innovation but in a
lot of areas it doesn’t even catch up with the current status of
other frameworks. It is likely to be outdated before it is actually
stable.
I wouldn’t use it for new projects and especially not for large
enterprise projects. In my opinion, there are two use cases to choose
JSF. The first use case is a project where the development team has
only experience with JSF, you are willing to accept higher
development costs and prefer that a technology changes slowly. The
second use case is an existing application using JSF 1.x which allows
you to keep the old stuff. In that case a migration to JSF 2 is an
acceptable choice.
Being a standard
A lot of people, see the fact that JSF is standardized, an
advantage. I do not agree here for a number of reason. First of all,
even using JSF you cannot write an application which uses only
standardized technologies. The JSF spec describes mostly the request
processing, navigation and basic components but not all advanced
features. Today, basic components which mirrors HTML elements are
just not enough. As a consequence, all component providers build
their own approaches to fulfil modern requirements. Most users chose
a modern component library to implement JSF application with modern
Ajax behaviour. All advanced features were not standardized and are
not compatible across component libraries. You end up with a thin
standardized layer and the rest is a set of non standardized
components. You choose one component provider and stay with it. If
you want to switch the component collection, then you will most
likely rebuild or migrate all dialogs.
The only advantage of standardizing is to create a rich community
of competing component projects. Competition encourages innovation.
Having a closer look at the different component collections, shows
that some collections are deprecated and most popular collections are
backed by a single vendor and not by a community. The only popular
community based component collection is MyFaces. But this project
though not being already dead, suffers from extremely slow progress
and little interest. A lot of elements have not changed for ages, it
lost the status of being the best JSF implementation. In my opinion,
the standardization did not encourage a rich community but the
opposite is true. A community grow only around attractive frameworks
which provides a high value for the users.
The second problem of standardizing is that a standard is a
compromise and it progresses very slowly. A compromise does not
include very innovative or individual features and needs to ensure
that it doesn’t change vertically. Changing vertically means that it
adds more responsibility as it had before. In JSF 1.x Ajax behaviour
were not defined. Every component provider solved Ajax requirements
differently and now JSF 2 introduces its own mechanism.
There is a fair chance that components collections do collide with
the new approach and they are left with basically two choices. Either
the libraries drop backward compatibility and adapt the new JSF 2
features or they stay old fashioned and just ignore it. In the latter
case, it is hard to predict how components libraries play together
with the standard JSF 2 Ajax, in case somebody mixes both approaches.
Burden of backward compatibility
The third problem of the JSF standard is the burden of backward
compatibility. Technologies live in a triangular space and choose
between a mixture of three extremes:
- Being genius and having all future requirements already
correctly forecasted - Changing continuously and breaking backward compatibility
- Changing slowly and preserving backward compatibility
The first extreme is rare, the second destroys your community as
users are annoyed every time they upgrade and need to adapt to a
changing API, the third one destroys the technology as it will become
outdated, bloated and inefficient in short time.
JSF were introduced in 2004 a time Ajax were unknown. Since then
web applications has changed a lot and today we have to build complex
Ajax dialogs. A development which lead to a number of single page
technologies like GWT, Flex, Java FX etc. Still JSF preservers
backward compatibility just adding features around the existing
stuff. There are now two types of resource bundles, three types of
events and two types of components. This makes it quite hard to use
JSF correctly and becomes a burden to all new users. Community driven
frameworks are normally technology driven as well and adapt
continuously to new requirements. JSF is industry driven and is not
able to drop old stuff as there will always be a party to complain.
For JSF being a standard becomes more and more its own pitfall.
By the way, standards are not a danger by default. The EJB spec
shows that a standard can be successful and innovate at the same
time. I think the main difference between EJB and JSF is that EJB has
a defined focus which is not changing and the elements of EJB are
loosely coupled. There is a programming model and a description of
container responsibilities. The programming model could
change/innovate significantly and old and new stuff still works.
Loosely couple systems are a very important approach to be able to
innovate technologies. This is the reason, why I value technologies
like Grails, JBoss Seam or an application using the full Spring stack
extremely critical. Today they are all very innovative and powerful
but if any element of these integrated solutions doesn’t work for a
specific use case or might become deprecated, then the whole stack
looses value or becomes use less.
Components
JSF offers two types of components: composite components and the
classic ones. Composite components are introduced with JSF 2. I would
call it a snippet instead of component, which allows to render a
number of components using a single custom tag. I think that it is a
mistake to introduce a new component approach and to leave the old
heavy components which have quite a number of contracts to follow.
Composite components are of course a great help but they lack the
Java code you can use in real components and it is only a help
because writing components in JSF is very complex. Writing custom
components is frequently used to ensure a consistent look and feel in
large enterprise application. Modern frameworks like Google Web
Toolkit (GWT), Tapestry or Wicket try to make this as simple as
possible. As a consequence, it is a common and frequently task for
developers using those technologies. In JSF writing of components is
a job for experts only. In fact most people use only finished
component collections and would never write a component themselves.
In my opinion, this is one of the strongest weaknesses of JSF 1.x and
it is not fixed with JSF 2 and as the JSF interest groups are mostly
industry companies preferring backward compatibility over efficiency
and innovation we won’t even see it fixed in any JSF version.
Scopes
JSF introduces now a flash scope, a view scope and support for
custom scopes. A flash scope is important to implement proper
post-redirect-get dialogs. It is not an innovation but catches up
with a feature available in all other frameworks. I think that the
use of the flash scope could be more elegant as it is quite verbose
and different as compared to other scopes like session or request
scope. I would expect a unique approach to deal with all scopes. The
view scope is slightly useless. The reason is that it works only, if
you use the old style POST navigation approach. I think that it was
overlooked that the new links or buttons, which cause a direct
navigation using a GET request will create a new view every time.
There is no defined point in time destroying the view scope. You
might run into memory issues, if you use it incorrectly.
Making such a scope work correctly is not at all easy. The reason
is that we use state in a multi-page web application and we don’t
have full control over the user. He can use browser back and forward
and reposting, bookmark URLs he shouldn’t. Other approaches
organizing the state around a conversation id looks better on the
first look but while using them, you find out quite fast, that it is
actually very difficult to create clean borders in your web
application, which cause a conversation state to end. This is why, I
promote the idea of a window id to be sent by a browser. This would
allow a much better control about what the user is doing inside of a
window.
http://www.laliluna.de/blog/categories/ideas/
Validation
The validation can be ajaxified with the new <f:ajax>
tag. Leaving an input field will validate the input for that field.
An Ajax request is sent to the server, which causes a partial
processing of the input element. This is much better than waiting for
a form submit but could cause DOS attacks against the server. Just
press the TAB-button, let the cursor jump from input field to input
field and see how many validations per second the server can process.
In addition, the validation is always delayed. A better approach is
to do the validation directly on the client without contacting the
server. The server validation is only a fallback for security reason.
The integration of the Hibernate Validation framework (Bean
Validation spec) looked liked a great improvement on the first view.
You add annotations like @Size or @Length to a field of
the managed bean or directly in an entity bean. This allows to use
the same set of validation rules for Hibernate and for JSF. This is
pretty nice and the integration works like a charm. The problem is
actually not a problem of JSF but of Bean Validation. Somehow in the
last moment, they changed the group validation to use class name
instead of strings. Group validations are an important feature to
validate only some validations instead of all. You need it, if you
use a managed bean for multiple forms like a wizard or multi page
dialog or if you want to have different validations depending on the
use case. Now you have to use the class name everywhere. Every input
field as a group marker like the following:
 <h:inputText value="#{inputBean.address.email}">
  <f:validateBean validationGroups="de.laliluna.howto.beans.Step1"/>
</h:inputText>
Happy copy and pasting. This is another example, that following
standards can be a disadvantage. The bean validation had another
issue, which is described in the related chapter of this article.
Actually, I am waiting for a initiative of a couple of other web
frameworks to create a common validation alternative.
Dependency Injection
Most major frameworks have a Dependency Injection Container now as
core element. Such a container allows to replace, change or extent
all elements of a framework. This is a very powerful approach to open
a framework for customized extensions. JSF provides extension points
as well and allows to override default functionality but there is no
unique place. JSF elements are created by different factories or by
changing application properties where as all business services are
created by the managed bean manager. The Java Dependency Injection
specification (alias Web Beans) has the intention to improve this
situation at least to provide a unique container for managed beans,
session beans and some core elements needed by the application. From
my understanding Web Beans would not replace but only integrate the
set of existing factories. I will update this section once all the
things are available.
To summarize, the lack of a DI container as core of the framework
is a disadvantage of JSF. I assume that this is again a tribute to be
backward compatible.
Future of web frameworks
I will add this section after the Devoxx conference end of November. It is an
outlooked how component oriented frameworks could change.
Notes for JSF developers
I collected some notes, which are mostly interesting for JSF
contributors. None of the notes are critical.
The class UIViewParameter has a private rawValue field.
This makes it harder to create a sub class. In addition to the decode
method, further methods have to be implemented or copy and pasted.
The MessageFactory could be public instead of package
private to allow using it in other areas as well. Access to resource
bundles is a very common use case.
The class NavigationHandlerImpl could split out view
resolution in order to allow easier overriding. I wanted to find out,
if the view is a redirect in order to store things in the session in
that case.
It is quite hard to provide a custom FacesContext . A number
of areas access FacesContext.getCurrentInstance which by
default delivers the unwrapped default context instead of the custom
context.
Holger’s opinion
AJAX became more and more important for
web applications over the last years. With the support of AJAX in JSF
2.0 it becomes a standard, which allows other components and
libraries to build on that. This improves the compatibility.
In JSF 1.x there is Facelets as
declaration language beside JSP. With JSF 2.0 Facelets becomes the
default page language. It provides templating, alleviate the creation
of components, allows debugging and has a better performance.
Management for resources, scripts and
stylesheets was standardized in JSF 2.0. Now resources can be
overridden and internationalized.
The validation was strong improved. Now
we only have to annotate attributes with the required validation
rules. Redundant validation rules within the JSP page are not
necessary anymore.
In JSF 1.x all navigation rules needed
to be defined in the faces-config.xml. With JSF 2.0 it is possible to
drop the navigation rules and to determine the target page by the
return value of action methods. Navigation in medium application are
simplified considerably.
JSF 1.2 is the standard framework
technology in JEE5 and JSF 2.0 will be the standard in JEE6.
Therefore, there will be many users of JSF.
The community’s opinion – beautiful features and concepts
I asked the following question on the mailing list:
What
is your favourite feature or concept of JSF,
what is unique as compared to other things, what is an eye catcher?
Though I posted the
questions in three forums, I only got two feedbacks. This is an
indicator that even though the number of users are very high, there
is actually no real community being engaged in JSF. The technology is
company driven.
Here are extracts or
rephrased parts of the feedbacks:
Andy Bosch
(translated from German)
My favourite feature is the resource handling. It was quite
difficult in former JSF version especially when using Portlets.
Lincoln Baxter
1. Composite Components — The ability to create fully reusable
components with zero java code required whatsoever. This is called
“EzComp”, which has sped up my development by about 400%.
2. Built in Facelets support for Templating — never re-write
HTML, you can re-use every piece of every page if you want to.
3. Built in AJAX — specify components to submit, and components to
re-render when the request has been processed. Very easy to use, plug
& play, no javascript required (but may be used if desired.)
4. Entire pages of the site, not just components, can be packaged in
their own jar files and included in the main application. No more
massive WebContent directories.
5. Improved community
participation — We are actively seeking feedback from the community,
and trying to get as much feedback and discussion as possible in
order to make JSF2 the best possible solution it can be.
Ed Burns
Ed Burns is a core developer of the JSF reference implementation (Mojarra). He added a detailed comment in his block at <http://weblogs.java.net/blog/edburns/archive/2010/01/21/response-sebastian-hennebrueders-jsf2-evaluation-and-test-entry>
Features
Render / page technologies
The reference implementation allows to create pages using Facelets
or JSP. Facelets are pages in XHTML format, whereas JSPs are JSPs.
The recommended approach is Facelets as it is faster and supports
templates out of the box.
Developer comfort
The developer comfort is still pretty low using Mojarra JSF.
Reloading of components and managed bean still depends on the
reloading mechanism of Java in debug mode. JSF 2 has adapted an idea
from Ruby on Rails. There is a setting which defines if the
application runs in development, production or test mode. The
intention is to allow component provides to deliver a more
development friendly behaviour in case of development mode. You need
to check for the component collection of your choice how it
interprets this value.
The following is a snippet from the web.xml.
 <context-param>
        <param-name>javax.faces.PROJECT_STAGE</param-name>
        <param-value>Development</param-value>
 </context-param>
Facelet and JSP pages can of course be reloaded.
There is an issue with logging in JSF.
JSF relies on Java logging which makes it by default quite hard to
change log levels. The Howto-project provided as source shows
how to bridge the logging to log4j. This allows to use the same log4j
configuration for your application and for JSF internals. Search for
the class LogRedirect . The redirect of the logging is
integrated using a system event listener for the Startup and Shutdown
events.
Mojarra supports Groovy to implement
managed beans and components. As groovy is a dynamic language, you
can make use of reloading of changes, which improves a lot the
development speed.
Ajax support
JSF 2 provides now a number of features to support Ajax. The first
feature is so called partial rendering. Instead of rendering a full
page only a partial response is rendered which is applied to the
document.
There is a new tag <f:ajax> to add Ajax behaviour to
an existing component. The following code shows a command button
which is ajax enabled. If you click the button, then JSF will send an
Ajax request to execute the actionListener *ajaxBean.increase.
- Then it will re-render the component with the id counter .
<h:form id="formId">
  The counter value is <h:outputText value="#{ajaxBean.counter}" id="counter"/>
  <h:commandButton actionListener="#{ajaxBean.increase}" value="Ajax call">
    <f:ajax render="counter"  />
  </h:commandButton>
</h:form>
Tip: If the component to re-render is not on the same nested level as
the component sending the Ajax request, then you need to specify the
full qualified name of the component. It starts with a colon <f:ajax
render=“:counter” />
If a component is nested inside of another component, then you need
to take into consideration that JSF is prefixing the outer id to the
component id.
The following counter can be re-rendered using
<f:ajax render=":foo:counter"/> <h:form id="foo"> <h:outputText value="#{ajaxBean.counter}" id="counter"/> </h:form>
If you disable JavaScript in your browser then the application
will fall back to the default behaviour. The button is no longer Ajax
enabled and submits the form.
The render value takes a space separated list of ids or
alternatively keywords. Keywords can have values like @form, @all,
@this, @none. @form re-renders the form which included the submit
button.
Another interesting attribute of f:ajax is execute. It sends an Ajax request and
processes the lifecycle only for the specified components. The
following code will process all the validations and re-render the
<h:messages> tag afterwards to show validation errors.
<h:inputText id="age" value="#{ajaxValidation.age}" required="true">
  <f:validateDoubleRange minimum="5" maximum="99"/>
  <f:ajax execute="age" event="blur" render="age-error"/>
</h:inputText>
<h:messages id="age-error" for="age"/>
This is quite verbose. To shorten the code you can make use of
composite components, which allows to render a number of tags by
specifying a short composite tag. Have a look in the custom component
chapter. Here is just the tag sample.
<my:text label="Word (is required)" value="#{ajaxValidation.age}" required="true" />
The JavaScript API provided by JSF 2
allows further control over the Ajax request send to the server.
CSS and JavaScript resource handling
A final feature related to Ajax is the
option to deliver resources. Resources can be JavaScript but as well
images and stylesheets. The following tag adds the test.js to
the head section of the page.
It renders the following XHTML
You need to place resources in the folder resources of the web
root or alternatively on the classpath in the directory
META-INF/resources. It is probably better to group resources
into libraries. Libraries are sub directories of the resources
directory. Here is a sample directory structure:
- webroot/resources/css/default.css
- webroot/resources/images/foo.gif
- webroot/resources/images/bar.gif
- webroot/resources/js/myscript.js
My script can now be referenced using <h:outputScript
library=“js” name=“test.js” target=“head”/>. In addition to the library a resource can be injected for a
specific version or locale. This is a very flexible approach to
handle different versions and locale dependent stylesheets or
JavaScript files.
Let’s assume the following directories
and files.
webroot/resources/de/js/default.js/1.0.js
webroot/resources/de/js/default.js/1.1.js
webroot/resources/en/js/default.js/1.0.js
A user with a german locale (de), using the following tag will get
the newest version of the German script
webroot/resources/de/js/default.js/1.1.js
<h:outputScript library="js" name="default.js" />
A page could use an older version as well. It just needs to specify
the resourceVersion .
<h:outputScript library="js" resourceVersion="1.0" name="default.js" />
Security
There is no build in security but you will find examples how to
integrate JSF with Spring Security. If you use JSF with JBoss Seam,
you can use its security functionality. Both approaches allow to
protect pages and methods. Spring has even support for domain based
security. It allows to check for an object returned by a method, that
the user has a specified right on that object class. The information
about the access right is stored in a pretty simple manner. The
object needs to have an id, think of the id of domain objects in Java
Persistence or Hibernate. The class, the id, the user and his access
rights (read, write, delete etc) are stored in a database. A method
interceptor checks if a method returns an object with access
restrictions.
These security solutions are very complete but in a lot of use
cases just to much. A simpler approach to security is explained on
the following website
<http://blogs.sun.com/enterprisetechtips/entry/improving_jsf_security_configuration_with>
It uses a global action listener and a custom navigation handler
to integrate security. The action listener is called before an action
method is executed. It checks if the user has the required roles to
access the method. The required roles can be specified using an
annotation on the action method.
  @SecurityRoles("customer-admin-adv, root")
  public String delete() {
    System.out.println("I'm a protected method!");
    return "delete-customer";
  }
I liked this approach as it is very simple and just does the job.
How do I do …?
You will find the source code of the following examples in the
provided howto project.
Navigation
JSF 2 has a number of improvements considering navigation. This
chapter assumes that you use Facelets (XHTML) as view technology. It
is the default in JSF 2.
The simplest form to have a link from a page to the page
navigationTarget.xhtml is the following link.
<h:link outcome="navigationTarget" value="Navigation samples"/>
It renders the following XHTML link.
<a href="/howto/faces/navigationTarget.xhtml">Navigation samples</a>
There is no need to configure navigation rules in the faces-config
for this use case.
You can easily add a parameter to the link.
 <h:link outcome="navigationTarget" value="Navigation samples">
  <f:param name="id" value="4711"/>
 </h:link>
The rendered link included the param as normal request parameter.
<a href="/howto/faces/navigationTarget.xhtml?id=4711">Navigation samples</a>
The value attribute can be an expression as well. Here is an example
of a list of articles. We print the list and create a link with the
id of an article as parameter.
 <h:dataTable value="#{navigation.articles}" var="article">
  <h:column><f:facet name="Edit"/>
    <h:link outcome="navigationTarget" value="Edit #{article.id}">
      <f:param name="id" value="#{article.id}"/>
    </h:link>
  </h:column>
</h:dataTable>
Using the parameter in the target page was less beautiful in JSF 1.×.
You had to extract it from the request and convert it to the type
you need.
 public Article getArticle(){
  ExternalContext context =
    FacesContext.getCurrentInstance().getExternalContext();
  Integer id = Integer.parseInt(context.getRequestParameterMap().get("id"));
  return articleService.findById(id);
 }
Now, you can use the tag f:metadata in the target page to write the
parameter into a managed bean property. Let’s have a look at a page
showing details of our domain object Article . The page is
called using a link with a parameter.
http://localhost:8080/howto/faces/navigationTargetArticle.xhtml?id=1
We define that the parameter should be written to the id property
of the managed bean articleBean. In addition we define error
messages in case the id is missing or cannot be converted. The most
interesting item is the f:event . It executes an action
listener to be called. In that case it is called before the view is
rendered and allows to load the article before you start to render
the page. This is an innovation in JSF 2.
 <f:metadata>
  <f:viewParam id="id" name="id" value="#{articleBean.id}"
    required="true"
    requiredMessage="You did not specify an id. (The id parameter is missing)"
    converterMessage="Invalid id. (The id parameter is not a number)"
    validatorMessage="Invalid id. (The id parameter is not a positive number)">
    <f:validateLongRange minimum="1"/>
  </f:viewParam>
  <f:event type="preRenderView" listener="#{articleBean.load}"/>
 </f:metadata>
You can use the f:metadata for a different purpose as well. If you
want to add a parameter to all links of the page, you can use the
following approach. First you create a metadata entry in your page.
You can place it right at the beginning of the page.
 <f:metadata>
  <f:viewParam id="id" name="id" value="4711"/>
 </f:metadata>
If a link should include those params, you add
includeViewParams=“true” to the link and the
parameter will be attached.
<h:link outcome="navigationTarget" includeViewParams="true" value="Navigation with param (success)"/>
Instead of referencing a target page directly in a GET request you
can make use of navigation rules. These are configured in the
faces-config.xml. If a navigation rule exist for a page, the
outcome attribute of a h:link will no longer be
interpreted as page name but as outcome of the navigation rule.
The link looks pretty much the same,
what we have seen already.
<h:link outcome="foo" value="Navigation sample"/>
The faces-confix.xml has now a navigation rule for the page
navigation.xhtml. The outcome value foo will
send the user to the page /navigationTarget.xhtml.
<faces-config ...>
...
<navigation-rule>
    <from-view-id>/navigation.xhtml</from-view-id>
  <navigation-case>
      <from-outcome>foo</from-outcome>
      <to-view-id>/navigationTarget.xhtml</to-view-id>
    </navigation-case>
  </navigation-rule>
</faces-config>
The rendered link looks like
Navigation sampleTraditional navigation control
The h:commandLink or the
h:commandButton are both nested inside of a form and ** submit
a form with a POST request. The navigation which happens after a
click is defined by navigation rules and optionally by the return
value (alias: outcome) of an action method. I will show a use case
without an action method first, then we are going to have a look at
the action method.
Both components provide an action
attribute. It can be set to a simple String value. In that case it
has the same meaning as the outcome attribute of a *h:link,
- it is used as from-outcome value in a navigation rule.
<h:form>
  <h:commandLink action="bar" value="Navigation with POST"/>
</h:form>
With JSF 2 the navigation rule is optional. By default JSF will try
to find a page named /bar.xhtml. In our case, we use a
navigation rule that will render the page navigationTarget.xhtml.
 <navigation-rule>
  <from-view-id>/navigation.xhtml</from-view-id>
  <navigation-case>
    <from-outcome>bar</from-outcome>
    <to-view-id>/navigationTarget.xhtml</to-view-id>
  </navigation-case>
 </navigation-rule>
If you want to reach the page using a HTTP Redirect, then you add the
following tag to the navigation rule.
 <navigation-case>
  <from-outcome>bar</from-outcome>
  <to-view-id>/navigationTarget.xhtml</to-view-id>
  <redirect/>
 </navigation-case>
If the current page has view parameters then they can be added to the
Redirect URL as well. Just add the attribute include-view-params.
This is useful for example if you want to make use of
Redirect-on-Post pattern. You visit the page *editArticle?id=1,
- send a Post which saves your input and Redirect visiting the page
editArticle?id=1 again with a normal GET request. If you
press Reload in your browser, it won’t ask to confirm the
reposting of values.
The final example will navigate to a
page depending on the outcome of an action method. The command link
(you may use a commandButton as well), reference an action method of
a managed bean. When clicking the link a POST request is send and the
action method of a managed bean is called.
 <h:form>
  <h:commandLink action="#{navigation.hello}" value="Navigation with redirect"/>
 </h:form>
Managed beans can be configured in the faces-config.xml or
since JSF 2 with the @ManagedBean annotation. The action
method returns ‘success’.
package de.laliluna.howto.beans;
import javax.faces.bean.ManagedBean;
@ManagedBean
public class Navigation {
  public String hello() {
    System.out.print("Entering hello");
    return "success";
  }
}
The ‘success’ value is used in the navigation case to decide that
we navigate now to the page navigationTarget.xhtml.
 <navigation-case>
  <from-outcome>success</from-outcome>
  <to-view-id>/navigationTarget.xhtml</to-view-id>
 </navigation-case>
If you have multiple action methods with the same outcome values, you
can add the action method as additional criteria. The following rule
is only valid for outcome values of the hello-action.
 <navigation-case>
  <from-action>#{navigation.hello}</from-action>
  <from-outcome>success</from-outcome>
  <to-view-id>/navigationTarget.xhtml</to-view-id>
 </navigation-case>
Friendly URLs
Friendly URLs are search engine and human eyes friendly. The
concept has its origin in RESTFUL applications. These applications
use so called meaningful URLs.
Here is a sample URL for a page showing a list of books
And a sample URL for a page showing book with id 12345
http://localhost:8080/books/12345or
http://localhost:8080/book/12345
In addition you may add a suffix to the URL to get the content in
different format.
  http://localhost:8080/book/12345.html // as HTML
  http://localhost:8080/book/12345.pdf // as PDF
  http://localhost:8080/book/12345.xml // as XML
JSF 2 supports now bookmarkable URL. We have seen in the last chapter
that you can add parameters to the URL. This is a major step forward
but today Java based frameworks like Stripes, Tapestry, Wicket and
more or less all Ruby based frameworks like Rails, Sinatra, Ramaze
etc support nice URL.
There is a discussion to support JSR-311 in JSF 2 but the current
status looks like as it won’t be supported directly. For JSF 1.x you
might have a look at <https://restfaces.dev.java.net/>
which provides support for some of the REST concepts. I would like to
show you how to use the extension points of JSF to get this
functionality.
We are going to extend JSF to be able to use URLs like
http://localhost:8080/book/12345
or
http://localhost:8080/books.
First, we will extend the view resolution to let JSF find the page to
render. Second, we will create a component extending the view
parameter. The component can be used in the f:metadata section to
write the parameter included with the URL directly to a managed bean.
If a page with the following snippet is called with an URL like
/navigationTargetArticle/1704, it will write 1704 into
the id property of articleBean.
 <f:metadata>
  <l:urlParam from="/navigationTargetArticle/$$" value="#{articleBean.id}"/>
  <f:event type="preRenderView" listener="#{articleBean.load}"/>
 </f:metadata>
The central element of a JSF 2 application is the Application
class, which can be configured from the faces-config.xml . The
resolution of a view happens during the RestoreViewPhase phase.
The class RestoreViewPhase uses a view handler to determine
the viewId. The view handler is a property of the application and can
be overridden with a custom implementation.
Just create a class FriendlyUrlViewHandler and configure
it in the faces-config.xml
public class FriendlyUrlViewHandler extends MultiViewHandler {}
 <faces-config ...>
  <application>
    <view-handler>de.laliluna.howto.application.FriendlyUrlViewHandler</view-handler>
  </application>
 ...
The method derivePhysicalViewId is
called to check if a view actually exists. A URL /books/foo could
point to a view /books/foo.xhtml or /books.xhtml with parameter foo.
protected String derivePhysicalViewId(FacesContext ctx, String rawViewId, boolean checkPhysical) {
  if (rawViewId != null) {
    String mapping = Util.getFacesMapping(ctx);
    String viewId;
    if (mapping != null) {
      if (!Util.isPrefixMapped(mapping)) {
        viewId = convertViewId(ctx, rawViewId);
        return checkExistence(ctx, viewId);
      } else {
        List<String> possibleViewIds = analyser.analyse(rawViewId);
        if (possibleViewIds == null) {
          possibleViewIds = Arrays.asList(rawViewId);
        }
        for (String path : possibleViewIds) {
          viewId = normalizeRequestURI(path, mapping);
          if (viewId.equals(mapping)) {
            // The request was to the FacesServlet only - no
            // path info
            // on some containers this causes a recursion in the
            // RequestDispatcher and the request appears to hang.
            // If this is detected, return status 404
            send404Error(ctx);
          }
          viewId = checkExistence(ctx, viewId);
          if (viewId != null) {
            return viewId;
          }
        }
      }
    }
  }
  return rawViewId;
}
The code for the UrlAnalyser class can be found in the
provided source code. Now, we can input links like
http://localhost:8080/faces/home
to call the home.xhtml. The next step is to create a component which
writes the URL value into a managed bean. The class *UIUrlParam
- has a parameter from , which expects a text that starts
with the url and has a $$ somewhere to indicate the value. This
String is converted into a regular expression.
package de.laliluna.howto.components;
import com.sun.faces.util.FacesLogger;
import java.util.logging.Logger;
import java.util.regex.Matcher;
import java.util.regex.Pattern;
import javax.faces.component.UIViewParameter;
import javax.faces.context.FacesContext;
public class UIUrlParam extends UIViewParameter {
  private static final Logger logger = FacesLogger.APPLICATION.getLogger();
  private String from;
  private Pattern pattern;
  private String rawValue;
  public static final String COMPONENT_TYPE = "de.laliluna.howto.components.UrlParameter";
  public UIUrlParam() {
    super(); // will set the renderer to null, as this component is not rendered
  }

  public String getFrom() {
    return from;
  }
  public void setFrom(String from) {
    this.from = from;
    String regex = from.replace("/", "\/").replaceFirst("\$\$", "([^/]?)");
    pattern = Pattern.compile(regex);
  }
  @Override
  public void decode(FacesContext context) {
    if (context == null) {
      throw new NullPointerException();
    }
    String path = context.getExternalContext().getRequestPathInfo();
    String viewId = context.getViewRoot().getViewId();
    if (viewId.equals(path)) {
    } else {
      Matcher matcher = pattern.matcher(path);
      if (matcher.find() && matcher.groupCount() > 0) {
        String param = matcher.group(1);
        if (param != null) {
          setSubmittedValue(param);
        }
      }
    }
    rawValue = (String) getSubmittedValue();
    setValid(true);
  }
  @Override
  public String getStringValue(FacesContext context) {
    String result = null;
    if (hasValueExpression()) {
      result = getStringValueFromModel(context);
    } else {
      result = (null != rawValue) ? rawValue : (String) getValue();
    }
    return result;
  }
  private boolean hasValueExpression() {
    return null != getValueExpression("value");
  }
}
The component doesn’t require a renderer. Now, we need to make JSF
aware of the component. We can either mark the component class with
the @FacesComponent(value =
“de.laliluna.howto.components.UrlParameter”) annotation
or configure it in the faces-config.xml
<faces-config ...>
...
<component>
    <component-type>
      de.laliluna.howto.components.UrlParameter
    </component-type>
    <component-class>
      de.laliluna.howto.components.UIUrlParam
    </component-class>
  </component>
</faces-config>
In addition we need to create a tag library. It is an xml file ending
with .taglib.xml
<!DOCTYPE facelet-taglib PUBLIC
  "-//Sun Microsystems, Inc.//DTD Facelet Taglib 1.0//EN"
  "http://java.sun.com/dtd/facelet-taglib_1_0.dtd">
<facelet-taglib>
  <namespace>http://www.laliluna.de/components/sample</namespace>
  <tag>
    <tag-name>urlParam</tag-name>
    <component>
      <component-type>de.laliluna.howto.components.UrlParameter</component-type>
    </component>
  </tag>
</facelet-taglib>
Please keep in mind that this is a working but simple implementation.
You may enhance it to your needs.
There is a more advanced extension as well to achieve nice URLs.
Have a look at <http://ocpsoft.com/prettyfaces/>,
which provides friendly URL functionality for JSF 1.x and JSF 2.
Templates
If you decided to use Facelets to
create pages (the recommend approach), then you have a flexible
template engine in your hand. The following is a template with two
place holders title and body specified with the
<ui:insert> tag. Both place holder have a default
content. The default content for body is Welcome.
 <?xml version='1.0' encoding='UTF-8' ?>
<!DOCTYPE html PUBLIC "-//W3C//DTD XHTML 1.0 Transitional//EN" "http://www.w3.org/TR/xhtml1/DTD/xhtml1-transitional.dtd">
<html xmlns="http://www.w3.org/1999/xhtml"
      xmlns:ui="http://java.sun.com/jsf/facelets"
      xmlns:h="http://java.sun.com/jsf/html">
  <h:head>
    <meta http-equiv="Content-Type" content="text/html; charset=UTF-8" />
    <title>Facelets - Template Example</title>
  </h:head>
  <h:outputStylesheet library="css" name="default.css"/>
  <body>
    <h1>
      <ui:insert name="title">Howto Samples</ui:insert>
    </h1>
    <h:link outcome="home" value="Back to Home Page"/>
      <p>
        <ui:insert name="body">Welcome</ui:insert>
      </p>
  </body>
</html>
Below you can see a page using the
template. The <ui:define> tags define the content
which is inserted at the place holder location of the template.
<?xml version='1.0' encoding='UTF-8' ?>
<body xmlns="http://www.w3.org/1999/xhtml"
      xmlns:ui="http://java.sun.com/jsf/facelets"
      xmlns:h="http://java.sun.com/jsf/html"
      xmlns:f="http://java.sun.com/jsf/core">
<ui:composition template="/template.xhtml">
  <ui:define name="title">
    Ajax Samples
  </ui:define>
  <ui:define name="body">
    <div>#{ajaxBean.time}</div>
  </ui:define>
</ui:composition>
</body>
An interesting feature is to decorate small fragments of a page with
a template.
<ui:decorate template="/layout.xhtml">
  <ui:define name="content">
  Foo bar
  </ui:define>
</ui:decorate>
.. more page
Using an expression, you can even localize or customize your
templates. The following code snippets decorates the code with a
template, which is chosen dependent on the users language.
<ui:decorate template="templatePart#{facesContext.viewRoot.locale}.xhtml">
  <ui:define name="titel">The legend</ui:define>
  <ui:define name="content">Content of the fieldset</ui:define>
</ui:decorate>
The Facelets template support is quite powerful and flexible and a
good reason not to create your pages based on JSP technology.
Forms and validation
Input handling
Input handling is a team game of pages, EL-expressions and managed
beans. A page contains a form with EL-expressions.
<h:form>
  <h:inputText id="name" value="#{inputBean.name}"/>
  <h:commandButton actionListener="#{inputBean.save}" value="Save"/>
</h:form>
When the form is submitted, the input for name is written into the
managed bean inputBean into the field name. Below you
can see an extract of the inputBean.
@ManagedBean @RequestScoped
public class InputBean {
  private String name;

  public String getName() {
    return name;
  }
  public void setName(String name) {
    this.name = name;
  }
...
}
There is a limitation considering nested objects. Most frameworks
instantiate nested objects automatically. Below you can see the
address as example. JSF doesn’t instantiate it for you and
requires that there is a constructor doing the job.
<h:form>
  <h:inputText id="name" value="#{inputBean.address.name}"/>
  <h:commandButton actionListener="#{inputBean.save}" value="Save"/>
</h:form>
If you add a constructor to the inputBean, the address will
always be instantiated, even if there are no values for the address.
In my opinion, this is really an annoyance as this might have side
effects, depending on the used technologies and requires unnecessary
code for nestest structures.
 public InputBean() {
  address = new Address();
 }
Validation
The validation approach of JSF is
flexible and can be customized. The only limitation I found is the
lack of a real client side validation. JSF 2 allows to validate a
field on jumping to the next field. It sends a request to the
server, which will do a partial of processing of this field only.
This is of course better than waiting for a form submit but it would
be much more efficient to drop the server request completely. Server
validation should only take place for security reason in case
somebody has disabled JavaScript.
There are two choices to implement
validations: the classic JSF validation tags directly in the page or
using bean validation (JSR 303). The bean validation is a framework
for validation and provides a consistent approach for input
validation, validation in the persistence layer or any other layer.
Validations can be defined using annotations in the managed bean or
the domain classes. If you prefer an external definition, then you
can use an XML file, validation.xml.
The classic approach has the
advantage that you can validate the same domain class differently in
different dialogs, which requires a very verbose group validation
configuration, if you use bean validation. The second approach has
the advantage that the same validations can be used for JSF, for a
webservice interface or just in the persistence layer to guaranty
consistency of the data. Below you can see an example using page
based validation.
<h:inputText id="name" value="#{inputBean.address.name}" required="true">
  <f:validateLength minimum="3" maximum="6" />
</h:inputText>
If you want to use annotation based validation, you will need an
implementation of the bean validation JSR. The reference
implementation is Hibernate 4.×. The configuration is pretty simple.
Just add the libraries hibernate-validator-4.0.0.GA.jar and
validation-api-1.0.0.GA.jar to your application.
In JSF 2 it is no longer to required to define the following
parameter in the web.xml. JSF 1.x needs the parameter for bean
validation to work. Otherwise empty values are not validated.
That’s all you need to do. JSF will
detect the availability of the validation libraries and check for
annotations in managed bean or domain models. I added the annotations
to the address class which is referenced by the managed bean
inputBean.
import javax.validation.constraints.NotNull;
import javax.validation.constraints.Size;
import java.util.Date;
public class Address {
  private Integer id;

  @NotNull
  private String name;

  @NotNull @Size(min = 2, max = 10)
  private String street;
Here is the inputBean class.
@ManagedBean @RequestScoped
public class InputBean {

  private Address address;

  public InputBean() {
    address = new Address();
  }
  public Address getAddress() {
    return address;
  }
  public void setAddress(Address address) {
    this.address = address;
  }
  ...
}
Bean Validation supports a feature called validation groups. It
allows to check only validations for a specific group instead of all
validations defined by annotations. This is useful if a managed bean
or a domain class is filled only partly by a dialog.
First you need to define that a input
field is validated with group validations. The following input field
triggers validations of the group
de.laliluna.InputBeanEmailValidation.
<h:inputText id="email" value="#{inputBean.address.email}">
  <f:validateBean validationGroups="de.laliluna.InputBeanEmailValidation"/>
</h:inputText>
The Address class has a field email having a validation
annotation.
@NotNull(groups = {InputBeanEmailValidation.class})
private String email;
You will find articles using a String as validation group. This is no
longer correct. The final draft of the bean validation specification
uses classes or interfaces as group names. In the worst case, you
need to define an empty interface. The group feature is a nice idea
to bring flexibility to annotation based validation but the idea to
use class names as groups is a real show stopper. Imagine you have 15
input fields and every field has the validation group tag. JSF
developers are likely in danger to get the nick name ‘copy pasties’.
I had some minor issues with Hibernate
Validation. The validation messages are not yet properly translated.
As a consequence you will have to provide your own messages. Another
problem was that Hibernate validation looks for custom messages in a
property file starting with ValidationMessages in the root of the
classpath (in web apps: WEB-INF/classes). It does currently not check
for a default property file as JSF does.
ValidationMessages.properties are not recognized but only
ValidationMessages_en.properties. The \_en suffix can be
replaced with the supported languages.
Another issues was that the
@Size validation can be used for the length of a String, the
size of a collection/map/array. The error message is saying that the
size is not correct which is a bad expression if a String is to short
or to long. If you specify only the min size, the error message is
telling you that the size has to be between 3 and 2147483647. This is
probably why the Hibernate implementation of the Bean Validation
Standard adds extensions like @Min and @Max.
Custom validation
JSF validation inside of the pages and bean validation can both be
customized. I will show you you to implement a custom validator which
checks if an email is an internal email. For my case, internal emails
end with ‘@laliluna.de’
JSF validator
You need to create a class implementing the Validator interface. If the validation fails, you should throw a
ValidatorException . The class MessageFactory is a class
of mine, which hides the access to resource bundles. Have a look in
the provided source code for details.
@FacesValidator("companyEmail")
public class CompanyEmailValidator implements Validator {
  public static final String VALIDATOR_ID = "companyEmail";

  public void validate(FacesContext facesContext, UIComponent uiComponent, Object value) throws ValidatorException {
    String email = (String) value;
    if (email != null) {
      email = email.toLowerCase();
      if (email.endsWith("@laliluna.de"))
        return;
    }
    throw new ValidatorException(MessageFactory.getMessage(facesContext, "validation_company_email"));
  }
}
The validator is identified by an ID. It is referenced when using the
validator:
<h:inputText id="email" value="#{inputBean.address.email}">
  <f:validator validatorId="companyEmail"/>
</h:inputText>
JSF is informed about a custom validator either by adding the
annotation @FacesValidator or by configuring the validator in
the faces-config.xml.
 <validator>
  <validator-id>companyEmail</validator-id>
  <validator-class>de.laliluna.howto.components.CompanyEmailValidator</validator-class>
 </validator>
Validators with parameters should implement the PartialStateHolder interface. Have a look in the
default length validator to see how a validator with parameter looks
like.
Bean Validation Custom Validator
There are three steps to create a custom validator
- An annotation to configure the validation for a field, sample @CustomEmail
- The Validation class
- Entries in the resource bundle for validation error messages
An annotation implementation looks like an interface with some
annotations. It is actually pretty simple. The annotation defines
which message key to use in case an error message needs to be looked
up in a resource bundle. This is specified with message. The
@Constraint annotation defines which class is implementing the
validator. The field groups allows to specify group
validations.
@Target({METHOD, FIELD, ANNOTATION_TYPE})
@Retention(RetentionPolicy.RUNTIME)
@Constraint(validatedBy = CompanyEmailValidator2.class)
@Documented
public @interface CompanyEmail {
  String message() default "{de.laliluna.howto.components.validation.companyemail}";

  Class<?>[] groups() default {};

  Class<? extends Payload>[] payload() default {};
}
The validation class needs to implement the interface *
ConstraintValidator.* It has two generic parameters. The first one
( CompanyEmail ) specifies that this is a validator for the
annotation CompanyEmail. The second one String specifies
that the input value is a String.
public class CompanyEmailValidator2 implements ConstraintValidator<CompanyEmail,String>{
  public void initialize(CompanyEmail constraintAnnotation) {
  }
  public boolean isValid(String value, ConstraintValidatorContext context) {
    if(value == null) // assume that the user uses @NotNull to validate not null
    return true;
    value = value.toLowerCase();
    return value.endsWith("@laliluna.de");
  }
}
The isValid method can return false to indicate that the
validation failed but may as well throw an exception. Finally, we add
the validation error message to the resource bundle
ValidationMessages. As already mentioned, this is the place
where Hibernate Validator looks for custom messages. Here is an
extract of ValidationMessages_en.properties
To summarize, customized validation is
quite simple to achieve in JSF both with the traditional approach of
JSF or using bean validation.
Have a look at the documentation of
Hibernate Validation on www.hibernate.org
to get more information on bean validation. The documentation is
quite good.
Cross field validation
Cross field validation means that you compare two or more fields
with another. Think of a date range and you want to validate that the
start date is before the end date.
The validation in JSF happens as part of the validation phase,
which executes validations per component. As a consequence, there is
no phase in the lifecycle which can be used for cross field
validation. The workaround to achieve cross field validation is to
specify a custom validation method for the last input field. There
are two notable attributes in this page. The first attribute is
binding . It specifies that the input component should be
injected into the managed bean which allows to access the input value
before it is written into the field from. The second attribute
is validator. It specifies a custom validation method in a
managed bean.
<h:inputText id="from" value="#{inputBeanCross.from}" binding="#{inputBeanCross.fromInput}"/>
<h:inputText id="to" value="#{inputBeanCross.to}" validator="#{inputBeanCross.validateMe}"/>
The validateMe method in the managed bean, extracts the value
from the component and compares both values. It throws an exception
in case the validation fails. This is the same behaviour as a normal
validator.
public class InputBeanCross {
  private Date from;
  // binding for the from input to access the value before it is written to the from field
  private UIInput fromInput;
  private Date to;

  public void validateMe(FacesContext context, UIComponent component, Object value) throws ValidatorException  {
    if(value==null)
      return;
    Date fromDate = (Date) fromInput.getValue();
    Date toDate = (Date) value;
      if (fromDate == null) {
      FacesMessage message = MessageFactory.getMessage(context, "validation_from_null");
      // add the error message to the from field
      context.addMessage(fromInput.getClientId(context), message);
      fromInput.setValid(false);
      // add the error message to the to field
      throw new ValidatorException(message);
    }
    if (toDate.before(fromDate)){
      FacesMessage message = MessageFactory.getMessage(context, "validation_from_to");
      // add the error message to the from field
      context.addMessage(fromInput.getClientId(context), message);
      fromInput.setValid(false);
      // add the error message to the to field
      throw new ValidatorException(message);
    }
  }
By default, the implementation will only display an error message at
the to field. The from field is not marked. As I wanted to show the
error message next to both input fields, I added the following lines
to mark the from field as invalid.
context.addMessage(fromInput.getClientId(context), message);
fromInput.setValid(false);
I wouldn’t call cross field validation very elegant but you achieve
it with the provided means.
Advanced converting
Converting for standard Java types works out of the box. This
includes Java 5 Enums which required a custom converter prior to JSF
2. For date fields you need to specify the date format. The following
code snippet shows an input field which uses a short date input. The
formatter is based on the Java date formatter.
<h:inputText id="from" value="#{inputBeanCross.from}"
  <f:convertDateTime dateStyle="short" type="date"/>
</h:inputText>
You can use the same converter to display a sample date to the user.
<h:outputText value="#{inputBean.sampleDate}">
  <f:convertDateTime dateStyle="short" type="date"/>
</h:outputText>
Customize converting of input
You can easily write a customized converter. A converter provides
two methods, one converting an input String from the browser to date
target type and one to convert the type into a String to display it
in an input field. Here is a sample converting a phone number in the
format ‘countryCode / prefix / code’ to an instance of Phone.
@FacesConverter(forClass = Phone.class)
public class PhoneConverter implements Converter {
  /**
   * Actually obsolete as we registered the converter in the faces-config by type
   */
  public static final String CONVERTER_ID = "de.laliluna.Phone";
  public Object getAsObject(FacesContext facesContext, UIComponent uiComponent, String rawValue) {
    Phone phone = null;
    if (rawValue != null && rawValue.length()>0) {
      String parts[] = rawValue.split("/");
      if (parts.length != 3)
        throw new ConverterException(MessageFactory.getMessage(facesContext,
            "phoneconverter-bad-string", new Phone("49", "123", "456789")));
      phone = new Phone(parts[0], parts[1], parts[2]);
    }
    return phone;
  }
  public String getAsString(FacesContext facesContext, UIComponent uiComponent, Object value) {
    // We are friendly and return at least an empty String
    String stringValue = "";
    if (value != null) {
      // Default components check if the value is a String and return it as it is
      if (value instanceof String)
        stringValue = (String) value;
      else if (value instanceof Phone) {
        Phone phoneValue = (Phone) value;
        stringValue = String.format("%s/%s/%s", phoneValue.getCountryCode(), phoneValue.getAreaPrefix(),
            phoneValue.getCode());
      } else
        throw new ConverterException(MessageFactory.getMessage(facesContext,"phoneconverter-bad-phone"));
    }
    return stringValue;
  }
}
The configuration of your converter can be done with an annotation or
inside of the faces-config.xml.
<converter>
  <converter-for-class>de.laliluna.howto.model.Phone</converter-for-class>
  <converter-class>de.laliluna.howto.components.PhoneConverter</converter-class>
</converter>
If you configure the converter for a class, as done in our example,
the converter is automatically chosen if the target type is an
instance of Phone.
If the target type is ambiguous, you can reference a converter
using an id.
The id can be specified in the annotation
@FacesConverter(value ="phoneConverter")
public class PhoneConverter implements Converter {
and in the faces-config.xml
<converter>
  <converter-id>phoneConverter</converter-id>
  <converter-class>de.laliluna.howto.components.PhoneConverter</converter-class>
</converter>
Id based and type based configurations are mutual exclusive.
The custom converter support of JSF is
flexible and simple to create. The only thing, I wondered about, was
that the converter interface wasn’t migrated to a generic
implementation in order to avoid type casts.
Common dialog tasks
Are more complex input widgets provided like calendars or tree tables
A central idea of JSF is that other companies can provide their
own component library. The core component of JSF are pretty simple
and reflect the input fields available in HTML. By default a JSF
implementation does not provide any complex input widget, but you
have a number of options.
The first option is to stay with the standard and not use any
component collections. There is a good reason to do this, as
components themselves are not standardized and most collections are
driven by a single vendor. You can still achieve advanced input
widgets using JavaScript. JavaScript can transform simple HTML tags
into an animated menu, tree structure etc. You may have a look at my
IT book evaluation portal <http://www.bibabook.de>
to see an accordion menu in action. I used the Jquery UI Javascript
library to achieve the effect. There are a number of powerful
JavaScript frameworks like Yahoo UI or the just named Jquery UI.
If you don’t want every developer of your team write JavaScript
code you may hide the JavaScript in a composite component. JSF 2
facilitates to add JavaScript behaviour to existing components, which
turns this approach into a viable option.
The second option is to use a component library. Mojarra provides
a new component library for JSF 2, which is based on Yahoo UI
JavaScript widgets. It is called Mojarra Scales. Sun had a component
collection named Woodstock which will be discontinued. Sun recommends
to use Icefaces instead for new projects. MyFaces provides two
component collections. One (Trinidad) was donated by Oracle a couple
of years ago, one is the original MyFaces collection. Oracle still
has its own component suite, called Oracle ADF Rich faces and JBoss
provides the Richfaces component library. Finally, there is
PrimeFaces which is less popular as the others but known to be very
fast. Yes, component libraries have an impact on application
performance.
A probably not complete overview about those and other component
collections can be found here:
<http://www.jsfmatrix.net/>
I added links to some of the components collections to the
reference below. Please, check carefully if the component collection
is still supported.
Is there a simple way to iterate through collections?
The UIRepeat component is meant to be used.
<ui:repeat var="item" value="#{inputBeanCross.articles}">
  <div><h:outputText value="#{item.name}"/></div>
</ui:repeat>
How do I hide a part of the page depending on a condition?
Every component supports a rendered attribute, which accept any
kind of EL expressions.
<h:inputText value="#{inputBean.address.phone}" rendered="#{inputBean.address.hasPhone}"/>
How do I print a sorting table?
You could use either <ui:repeat> or <ui:dataTable> to render a table. Inside of the table you add ajax enabled forms
to submit the sort criteria and call the sort method. I added a parameter to every link and used the <f:viewParam id=“id”
name=“sortCriteria” value=“#{ajaxTable.sortCriteria}”/> to write the parameter into the managed beans sortCriteria field. The action listener calls the sort method.
<?xml version='1.0' encoding='UTF-8' ?>
<!DOCTYPE html PUBLIC "-//W3C//DTD XHTML 1.0 Transitional//EN" "http://www.w3.org/TR/xhtml1/DTD/xhtml1-transitional.dtd">
<html xmlns="http://www.w3.org/1999/xhtml"
      xmlns:ui="http://java.sun.com/jsf/facelets"
      xmlns:h="http://java.sun.com/jsf/html">
  <h:head>
    <title>Facelets - Template Example</title>
  </h:head>
  <body>
<f:metadata>
  <f:viewParam id="id" name="sortCriteria" value="#{ajaxTable.sortCriteria}"/>
</f:metadata>
<h:form>
  <h:dataTable id="table" value="#{ajaxTable.articles}" var="a">
    <h:column>
      <f:facet name="header">
        <h:commandLink actionListener="#{ajaxTable.sort}" value="Id">
          <f:ajax render="table"/><f:param name="sortCriteria" value="id"/>
        </h:commandLink>
      </f:facet>
      <h:outputText value="#{a.id}"/>
    </h:column>
  </h:dataTable>
</h:form>
</body>
</html>
If your application server does already support the new EL
modification to JSR 245 (for example Glassfish v3, then you can just
pass a value to a method using the new EL expression.
<h:commandLink actionListener="#{ajaxTable.sort('id')}" value="Id">
  <f:ajax render="table"/><f:param name="sortCriteria" value="id"/>
</h:commandLink>
Most component libraries provide grid or table components as well.
Multi row input and indexed properties
Creating a table from a list of objects is on the first look
pretty simple. You create a managed bean which provides a List of
articles.
public class AjaxTable {
  public AjaxTable() {
    editArticles =  ServiceFactoryImp.getInstance().getService(ArticleService.class).findAll();
  }

  public List<Article> getEditArticles() {
    return editArticles;
  }

  public String save() {
    ArticleService service =
        ServiceFactoryImp.getInstance().getService(ArticleService.class);
    for (Article article : editArticles) {
      logger.debug("Create or update {}", article);
      service.update(article);
    }
    return "ajaxTable?faces-redirect=true";
  }
...
and use it with a <h:dataTable>
<h:form>
  <h:dataTable id="table" value="#{ajaxTable.editArticles}" var="a">
    <h:column>
      <f:facet name="header">
        Id
      </f:facet>
      <h:outputText value="#{a.id}"/>
    </h:column>
    <h:column>
      <f:facet name="header">
          Name
      </f:facet>
      <h:inputText id="name" value="#{a.name}"/>
      <h:message for="name"/>
    </h:column>
    <h:column>
      <f:facet name="header">
        Description
      </f:facet>
      <h:inputTextarea rows="3" cols="40" value="#{a.description}"/>
    </h:column>
  </h:dataTable>
  <h:commandButton value="Save" action="#{ajaxTable.save}"/>
</h:form>
The problem are only visible on the second look. When processing the
form submit, JSF will not create a list of articles from the input
form, but expects that the list is already there. The constructor
initializes the editArticles not only for the rendering but as well
for the input processing. As long as we know which and how many
articles are being edited, this is no problem but it becomes a
problem, if we allow to add empty articles. In that case we need to
put the managed bean into the session scope with the side effect that
we cannot use the same dialog in two browser windows.
The reason why other frameworks have
less problems with such a use case is that the binding used to print
a list of objects is not correlated with the handling of the input.
The submit of such a table of data will create the target objects on
the fly.
Message resources and internationalization
JSF supports the common approach to
store messages in property files. A property file with the suffix
‘_en’ is used for an English local and the property file with a ‘_de’
suffix is used for German locale. If you distinguish British English
and American English, then you can add the country to the suffix like
‘_en_GB’.
If you support English and German, then
you might have the following resource bundle files
- messages.properties
- messages_en.properties
- messages_de.properties
The first resource bundle is optional
and contains the default texts. It is used if a message cannot be
found in the other bundles. It might be simpler, if you leave out the
english resource bundle, assuming that English is your default
language, and store the English texts in the default bundle and drop
the messages_en.properties file.
This is how a resource bundle looks
like
The configuration of a resource bundle is simple. You can load it
globally for all views or for a specific view.
A global configuration happens inside
of the faces-config.xml. The following configuration will load
property files like messages.properties, messages_de.properties from
the package de.laliluna.howto and make it available as
request variable with the key m.
<resource-bundle>
  <base-name>de.laliluna.howto.messages</base-name>
  <var>m</var>
</resource-bundle>
Inside of a page you can now use it with an EL-expression.
#{text.bar}
<h:outputLabel for="foo" value="#{text.bar}"/>
A nice option is to use a message with place holder as in Java class
MessageFormat. The following are the entries in the resource bundle.
The following tag prints the text ‘User not found’
<h:outputFormat value="#{text.notfound}">
  <f:param value="#{text.user}"/>
</h:outputFormat>
If you want to use a resource bundle
only in a limited number of views, then you can explicitly load a
resource bundle into a view. The following tag inside of a page,
makes the resource bundle available under the key text.
Programmatically accessing resource bundles
You can access the global bundle
messages programmatically as well.
public String getHello(){
  FacesContext context = FacesContext.getCurrentInstance();
  ResourceBundle bundle = context.getApplication().getResourceBundle(context, "m");
  return bundle.getString("hello");
}
If you want to access another resource bundle, you need to follow a
slightly different approach.
public String getGoodBye(){
  FacesContext context = FacesContext.getCurrentInstance();
  ResourceBundle bundle = ResourceBundle.getBundle("de.laliluna.howto.anotherbundle", context.getViewRoot().getLocale());
  return bundle.getString("goodbye");
}
Configuring Locales
You can see in the last code snippet
that the locale of the user is stored in the root component of a
view. The locale is normal chosen from the browser locales. You can
limit the available choices by configuration in the faces-config.xml .
The following code snippet defines that the en and de are
supported. En is used as default in case the browser has
another locale configured. You should always configure a default
locale or visitors might see a broken page.
<faces-config ...>
  <application>
   <locale-config>
    <default-locale>en</default-locale>
    <supported-locale>de</supported-locale>
  </locale-config>
You can define on a page that it should render in a specific locale.
Below you can see an example with a static value and another one with
a EL-Expression.
<f:view locale="en">
<f:view locale="#{userBean.locale}">
I didn’t like this approach as it requires the EL in all views. It is
in fact poorly documented how to do customize the locale selection.
One thing is important: if you want set the locale in the root
component, then you need to do this before the render phase. I added
a phase listener which determines the locale from a managed bean in
the session scope. This allows to change the locale programmatically.
The following code snippet is an
extract of the class LocaleRenderPhaseListener. The first part
creates an EL-Expression to get the userBean. The last line
sets the locale the locale of the userBean .
public void beforePhase(PhaseEvent phaseEvent) {
  FacesContext context = phaseEvent.getFacesContext();
  Application application = context.getApplication();
  ExpressionFactory factory = application.getExpressionFactory();
  ValueExpression valueExpression = factory.createValueExpression(context.getELContext(),
      "#{userBean}", UserBean.class);
  UserBean userBean = (UserBean) valueExpression.getValue(context.getELContext());
  context.getViewRoot().setLocale(userBean.getLocale());
}
Validation and Error messages
Validation messages are taken from a
message bundle, which is slightly different then the resource bundle,
I explained so far. Before JSF 1.2 only the message bundle were
available.
JSF provides already resource bundle
for converter and validations. If you want to overwrite those values
then you can specify the values in a message bundle and configure it
in the faces-config.xml
<faces-config ...>
  <application>
   ...
   <message-bundle>
     de.laliluna.howto.customerrors
   </message-bundle>
This is the place where custom validator and converter will look up
messages as well. There is a common approach of validation and
converter errors to provide a short message as default and details in
a key with a \_detail suffix.
Exception handling
Exception handling has changed and is way better then in JSF 1.×.
First, I will show you the simplest form and then we have a look at
the new options.
This description is mostly taken from
<http://weblogs.java.net/blog/edburns/archive/2009/09/03/dealing-gracefully-viewexpiredexception-jsf2>
The simplest form is to provide a mapping from Exception to error
pages in the web.xml
<error-page>
  <exception-type>java.lang.IllegalArgumentException</exception-type>
  <location>/faces/error.xhtml</location>
</error-page>
JSF stores a number of values in the request which allows to show
more details on the error page. Here is a snippet form my error page.
<h2>You have encountered a system error</h2>
The error message is: #{requestScope['javax.servlet.error.message']}<br>
Below are informations for the system administrators <br>
<textarea rows="20" cols="80" disabled="true"><h:outputText escape="false" value="#{errorBean.stackTrace}"/></textarea>
The managed bean extract the exception from the request and builds a
String from the stacktrace. This example is kept simplistic and you
may improve the method to print nested exceptions or to determine the
root cause.
@ManagedBean
public class ErrorBean {
  private static final String BR = "n";

  public String getStackTrace(){
    FacesContext context = FacesContext.getCurrentInstance();
    Map<String,Object> map = context.getExternalContext().getRequestMap();
    Throwable throwable = (Throwable) map.get("javax.servlet.error.exception");
    StringBuilder builder = new StringBuilder();
    builder.append(throwable.getMessage()).append(BR);
    for (StackTraceElement element : throwable.getStackTrace()) {
      builder.append(element).append(BR);
    }
    return builder.toString();
  }
}
If you want to customize the exception handling further, then you can
add your own exception handler and take control over the process.
A custom exception handler is
integrated using by configuring it in the faces-config.xml .
<faces-config ...>
 <factory>
  <exception-handler-factory>
    de.laliluna.howto.application.CustomExceptionHandlerFactory
  </exception-handler-factory>
 </factory>
In fact you specify a factory, which will create your custom
exception handler. In the custom exception handler, we can override
the handle method. My implementation redirects to a special
view page in case of a ViewExpiredException. The following code
iterates over the not handled exceptions and in case it is a
ViewExpireException, deal with it and remove it from the iterator. It
is important to remove the exception or it will be handled multiple
times.
public void handle() throws FacesException {
  Iterator<ExceptionQueuedEvent> iterator = getUnhandledExceptionQueuedEvents().iterator();
  while (iterator.hasNext()) {
    ExceptionQueuedEvent event = iterator.next();
    ExceptionQueuedEventContext context = (ExceptionQueuedEventContext) event.getSource();
    if (context.getException() instanceof ViewExpiredException) {
      ViewExpiredException exception =
        (ViewExpiredException) context.getException();
      FacesContext fc = FacesContext.getCurrentInstance();
      Map<String, Object> requestMap = fc.getExternalContext().getRequestMap();
      NavigationHandler nav =
          fc.getApplication().getNavigationHandler();
      try {
        // in development mode, we want to show the normal debug screen of facelets
        if(fc.isProjectStage(ProjectStage.Development)){
          fc.getExternalContext().getRequestMap()
            .put("com.sun.faces.error.view", fc.getViewRoot());
          throw new FacesException(context.getException().getMessage(),
             context.getException());
        } else{
        // Push some useful stuff to the request scope for
        // use in the page
        requestMap.put("currentViewId", exception.getViewId());
        nav.handleNavigation(fc, null, "viewexpired");
        fc.renderResponse();
        }
      } finally {
        iterator.remove();
      }
    }
  }
  super.handle();
}
At the time of writing, JSF 2 wrapped
exceptions from action methods and action listener into an
AbortProcessingException. If your managed bean or the business layer
called by the managed bean throw an exception, then it was swallowed.
I assume that this is a bug in the tested version and implemented a
workaround in the custom exception handler. Have a look into the
provided source code. Keep in mind that the version of JSF, I tested,
is not yet stable.
Redirect on post and flash scope
Redirect on post doesn’t work for all use cases. If you want to
make use of the URL parameter for the following request series, then
you won’t have luck.
1. GET /books/edit.xhtml?id=4711
2. POST of input
3. REDIRECT to /books/edit.xhtml?id=4711
At the time of writing JSF 2 didn’t allow to include view
parameters in an input form. This is only possible for a GET request
using the new <link> or <button> tags.
What is possible to do a redirect after a POST request and store
messages and objects in the flash scope. Just in case, you haven’t
read the initial article of this series. It is a scope, which is
inspired by Ruby on Rails. It preservers objects for the next
request, if you do a redirect.
A flash scope was introduced with JSF 2. If you want to print a
message after a redirect, then you can use the following code in an
action method. I used implicit navigation without navigation rules in
the faces-config.xml in this sample.
public String save(){
  FacesContext context = FacesContext.getCurrentInstance();
  context.getExternalContext().getFlash().setKeepMessages(true);
  context.addMessage(null, new FacesMessage("The name was successfully saved "));
  return "article?faces-redirect=true";
}
In addition your can store arbitrary values in the flash scope.
context.getExternalContext().getFlash().put(“foo”,“bar”);You can access those values using EL-Expressions
#{flash[‘foo’]}or
#{flash.foo}
or programmatically.
context.getExternalContext().getFlash().get(“foo”);Conversation context, wizards and workflows
There is no build in support for wizards or workflows. There are a
number of external solutions to solve this problem like Apache
Orchestra, JBoss Seam, Spring WebFlow and in the future the
integration of Web Beans (alias JSR 299, alias Java Dependency
Injection) will provide another option.
In this article, I would like to achieve a wizard using the
provided extension options. We can follow two strategies to do this.
The first is to define a custom scope, which is stored in the session
scope. Inside the custom scope, you could add a wizard using a key
like ‘cart_checkout’. The disadvantage of this approach is that you
cannot have multiple instances of the wizard in different browser
windows.
Recently, I came up with the idea that the browser could
send a window-id as request header and promoted the idea to the
browser vendors. See <http://www.laliluna.de/articles/ideas/>
This would allow to have a wizard with the same key per browser
window. I wrote a plugin for Firefox, which provides the window-id
and are about to write the plugin for Safari and IE. But at the
moment, we have to live with the fact that browsers share the session
across windows.
The second approach is to identify a wizard using an id. This an
approach for example available in JBoss Seam. They call it
conversation scope. This approach requires that the id is part of
every link and every form. If we used the classic JSF approach to
send only POST requests, then this could be hidden more easily but
the bookmarkable URLs of JSF 2 come with the tradeoff that
information like that needs to be in the URL as well. This is why, I
promote the idea of the windows-id.
Finally, let’s start doing it. I will use the second approach,
which identifies the wizard using an id. The following steps are
required to achieve this:
- Create a custom scope
- Create a custom component to be used to add the id to forms
- Leave the custom link component for the reader ;-)
- Make sure that the id survives a redirect
Creating a custom scope is demonstrated in the blog of Ryan Lubke.
We need an EL-resolver for our scope. An EL-expressions like #{wizardScope.myBean} is resolved piece by piece. First all
EL-resolvers are asked for the part wizardScope. Once the
scope is resolved, the EL-resolvers are asked to resolve myBean in
the first part, the wizard scope instance. As a consequence, our
EL-resolver needs to resolve the scope itself and beans inside of the
scope.
The following is an extract of the class
WizardScopeResolver. The first method is internal and extracts
the scope from the HTTPSession . The second is doing the
‘normal’ EL resolution.
 private WizardScope getScope(ELContext elContext) {
  CustomFacesContext ctx = CustomFacesContext.getCurrent();
  HttpSession session = (HttpSession) ctx.getExternalContext().getSession(true);
  WizardScopeResolver.WizardScope wizardScope = null;

  synchronized (session.getId()) {
    Map<String, WizardScope> scopes = (Map<String, WizardScopeResolver.WizardScope>) session.getAttribute(
      WizardHelper.WIZARD_SCOPE_KEY);
    if (scopes == null) {
      scopes = new HashMap<String, WizardScope>();
      wizardScope = new WizardScopeResolver.WizardScope();
      scopes.put(ctx.getWizardId(), wizardScope);
      logger.debug("Created wizard scope with id ({})", ctx.getWizardId());
      session.setAttribute(WizardHelper.WIZARD_SCOPE_KEY, scopes);
    } else {
      wizardScope = scopes.get(ctx.getWizardId());
      if (wizardScope == null) {
        wizardScope = new WizardScopeResolver.WizardScope();
        scopes.put(ctx.getWizardId(), wizardScope);
        logger.debug("Created wizard scope with id ({})", ctx.getWizardId());
      }
    }
  }
  return wizardScope;
 }
 public Object getValue(ELContext elContext, Object base, Object property) {
  if (property == null) {
    throw new PropertyNotFoundException("Could not resolve property, as property name is null");
  }
  if (base == null) {
    if (SCOPE_NAME.equals(property.toString())) {
      elContext.setPropertyResolved(true);
      return getScope(elContext);
    } else {
      return lookup(elContext, getScope(elContext), property.toString());
    }
  } else if (base instanceof WizardScope) {
      return lookup(elContext, (WizardScope) base, property.toString());
  }
  return null;
 }
Once, this is done, we can add the EL-resolver to the
faces-config.xml .
<faces-config...>
  <application>
    <el-resolver>de.laliluna.howto.application.WizardScopeResolver</el-resolver>
Now, we can use already our scope.
@ManagedBean
@CustomScoped("#{wizardScope}")
public class WizardBean {}
But you might wonder already, where did we create the id of the
wizard scope. Well, it is not yet created. We use the id null.
The next step is going to improve this. We create a managed bean
which allows to create and destroy scopes and let you deal with the
current scope.
@ManagedBean @ApplicationScoped
public class WizardHelper {
  public static final String WIZARD_SCOPE_KEY = "de.laliluna.WizardScope";
  private AtomicLong wizardId = new AtomicLong();
  public void start() {
    CustomFacesContext context = CustomFacesContext.getCurrent();
    context.setWizardId(String.valueOf(wizardId.incrementAndGet()));
  }
  public void end() {
    CustomFacesContext context = CustomFacesContext.getCurrent();
    WizardScopeResolver.destroyScope(context);
    context.setWizardId(null);
  }
  public <T> T get(String key) {
    return (T) getOrCreateScope().get(key);
  }
  public void put(String key, Object value) {
    getOrCreateScope().put(key, value);
  }
...
The start method is storing the wizardId in a custom FacesContext.
The FacesContext is created for every request and is actually an
inviting place to store things related to the current request. As a
consequence, we need a custom FacesContext class and a custom factory
as contexts are created by a factory. The normal approach is to
create a custom faces context factory is to extend from a wrapper
class. JSF provides a number of wrapper classes for internal
elements. Our custom context has an additional property wizardId.
public class CustomFacesContext extends FacesContextWrapper{
  private String wizardId;

  private FacesContext wrapped;

  public CustomFacesContext(FacesContext wrapped) {
    this.wrapped = wrapped;
    contextThreadLocal.set(this);
  }
  public static CustomFacesContext getCurrentInstance(){
    return contextThreadLocal.get();
  }
  @Override
  public void release() {
    this.wizardId = null;
    contextThreadLocal.set(null);
    contextThreadLocal.remove();
    super.release();
  }
  public boolean isWizardEnabled(){
    return wizardId != null;
  }
  public String getWizardId() {
    return wizardId;
  }
  public void setWizardId(String wizardId) {
    this.wizardId = wizardId;
  }
...
}
I am not showing the factory class here but only how to integrate it
into JSF. In the faces-config.xml you need to configure your
class in the factory section.
<faces-config...>
<application>
...
<factory>
  <faces-context-factory>
    de.laliluna.howto.application.CustomFacesContextFactory
  </faces-context-factory>
</factory>
There is a annoying pit fall, if you create a custom FacesContext.
It looks pretty straight forward to create a custom faces context.
The problems became rapidly visible, when using it. The provided
faces context of JSF has a static method getCurrentInstance ,
which returns the current instance extracted from a ThreadLocal .
This method is used internally at a number of places. It doesn’t
return your custom context but the wrapped default context. When
creating more custom things like components, event listener or other
custom factories, then sometimes the default (not your) context is
passed as method parameter. You need to be aware of this at all
places. As a consequence, your own custom context needs to provide
its own (redundant) ThreadLocal and a static method to return the
current instance. In my opinion this is a design weakness of JSF.
The next step is to create a component,
which can be integrated in a form and passed the wizard id with the
POST request. The component can be used as follows.
<h:form>
  <l:wizardId/>
  Age: <h:inputText value="#{wizardBean.age}"/>
  <h:commandButton action="#{wizardBean.finish}" value="Finish"/>
</h:form>
The implementation provides encode methods to render a hidden input
field and decode methods to extract the wizard id and store it in the
custom context.
public class WizardId extends UIInput {
  @Override
  public void encodeBegin(FacesContext context) throws IOException {
    ResponseWriter writer = context.getResponseWriter();
    assert (writer != null);
    writer.startElement("input", this);
    writer.writeAttribute("type", "hidden", "type");
    String clientId = getClientId(context);
    writer.writeAttribute("name", clientId, "clientId");
    // render default text specified
    CustomFacesContext customContext = (CustomFacesContext) context;
    if (customContext.isWizardEnabled()) {
      writer.writeAttribute("value", customContext.getWizardId(), null);
    }
    writer.endElement("input");
  }
  @Override
  public void encodeEnd(FacesContext context) throws IOException {
  }
  @Override
  public void decode(FacesContext context) {
// let the default implementation extract the value and store it in the submitted
//value field
    super.decode(context);
    CustomFacesContext customContext = (CustomFacesContext) context;
    Object value = getSubmittedValue();
    if (value != null) {
      customContext.setWizardId(value.toString());
    }
  }
}
The final step is to keep track of a special case. An action method
can redirect to another page. Somehow we need to keep track of the
wizard id. We have two options:
- Add the wizard id as URL parameter
/faces/mypage.xhtml?wizardId=4711 - Store the wizard id temporarily in
the session scope and restore it immediately with the GET request
The first approach is used for example
by JBoss Seam but has the downside that your URL is polluted with the
id and the id is likely to be stored as well, if someone bookmarks
the page.
The second approach could have
theoretically a flaw, if the same user is sending to browser requests
quickly and by hazard the the second request is processed before the
redirect of the first. The second request would steal the wizard id.
I suppose that such a unwanted case is very hard to reproduce. As a
consequence, I think that the approach is a viable solution.
The resolution of a view and the actual
redirect is happening in the navigation handler. In order to store
the id, we need to provide a custom navigation handler. The JSF
default navigation handler is not very extension friendly. Important
steps are performed in private method. As a consequence, I needed to
copy the complete source code of the existing implementation and add
the lines to store the wizard id. Here is a snipped from the class
CustomNavigationHandler.
...
if (caseStruct.navCase.isRedirect()) {
  CustomFacesContext customFacesContext = CustomFacesContext.getCurrentInstance();
  if(customFacesContext.isWizardEnabled()){
  extContext.getSessionMap().put(Globals.WIZARD_SESSION_KEY,
    customFacesContext.getWizardId());
}
The last step is to restore the wizard id after a REDIRECT. This can
be achieved in a phase listener.
I added the code in the class
GlobalPhaseListener. Right before the first phase, the restore
view phase, the id is written into the custom faces context.
public void beforePhase(PhaseEvent event) {
  // restore a wizard id
  if (event.getFacesContext() instanceof CustomFacesContext) {
    CustomFacesContext context = (CustomFacesContext) event.getFacesContext();
  String key = (String) context.getExternalContext()
      .getSessionMap().remove(Globals.WIZARD_SESSION_KEY);
  if (key != null) {
    context.setWizardId(key);
  }
}
That’s all we need to provide a wizard scope in our application. I
wouldn’t say that it is very simple but it is possible.
This implementation is not bullet prove. It only demonstrates, how
you can achieve a wizard scope. It doesn’t validate if a wizard page
is revisited using browser back for example or if you visit a wizard
page without a wizard being started.
Double submit handling
Double submits of input forms are not validated by default. To
validate double submit you can follow the approach used in the
Tapestry or the Stripes review. This approach adds a hidden field
with a unique token to the input form. The token is stored in a
application scoped variable or alternatively in the users session.
The latter approach is probably better as the session’s timeout would
clean up the users token as well. If the form is submitted, a phase
listener checks if there is a token in the form and if the token is
valid. It is valid, if it is included in the list of existing tokens.
For JSF you can implement this with either a custom component,
which is added to every form with double submit validation or
alternatively by overridden the renderer of the form.
You can find an example based on JSF 1.x on the following page.
You just need to port the concept to JSF 2:
<http://www.jroller.com/mert/entry/jsf_preventing_double_form_submit>
Custom components
A component is an element of a page. It is specified using a tag.
Below you can see a component rendering a link.
You can create your own components, which can be visual or non
visual. An example for a non visual component is a loop component
which let only render the components inside of the loop render
themselves.
There are two types of components in JSF 2. The classic components
which were available in JSF 1.x as well and so called composite
components which are a new feature of JSF 2. The classic components,
I will call them just components, are normal components which have
Java code to render or to process input etc. Just like the standard
JSF components. The composite components look like a code snippet
which can render a number of components using a single tag.
Let’s explore the composite components first and then we will have
a look at building real component starting from a hello world up to a
full flavoured Ajax component.
Composite components
A composite component is a snippet which renders a number of
components by just using a single tag. Instead of writing the
following code
<div>
<h:outputLabel value="Word (is required)"/>
  <h:inputText id="input" value="components.word" required="true">
    <f:ajax execute="input" event="blur" render="input-error"/>
  </h:inputText>
  <h:messages id="input-error" for="input"/>
</div>
you can use a single tag.
Composite components follows a convention over configuration approach
to integrate with JSF.
The following page makes use of composite components. The
namespace xmlns:my=“”http://java.sun.com/jsf/composite/sample">http://java.sun.com/jsf/composite/sample
defines the prefix and the location of the composite components.
<!DOCTYPE html PUBLIC "-//W3C//DTD XHTML 1.0 Transitional//EN"
    "http://www.w3.org/TR/xhtml1/DTD/xhtml1-transitional.dtd">
<html xmlns="http://www.w3.org/1999/xhtml"
      xmlns:h="http://java.sun.com/jsf/html"
      xmlns:f="http://java.sun.com/jsf/core"
      xmlns:my="http://java.sun.com/jsf/composite/sample">
<head>
  <title>This will not be present in rendered output</title>
</head>
<body>
<h:form>
      <my:text label="Word (is required)" value="#{components.word}" required="true" />
      <my:text label="Age (between 5 and 99)" value="#{components.age}" required="true" >
        <f:validateDoubleRange for="input" minimum="5" maximum="99"/>
      </my:text>
      <h:commandButton value="Submit"/>
    </h:form>
</body>
</html>
A namespace like http://java.sun.com/jsf/composite/sample
assumes that the component is defined in a folder
web/resources/sample. The component <my:text> is defined
in the file text.html in that folder. Below you can see the
component definition. It is a normal xhtml file.
The tag <composite:interface> defines how the tag is used in a page. Our component has three
attributes: label, value and required. The first two attributes are
required, the last one is optional. In addition the tag
<composite:editableValueHolder> specifies that an input
component is included in the composite component.
The implementation is defined inside of
the tag <composite:implementation>. It uses the EL
expression to reference the attributes of the components.
<!DOCTYPE html PUBLIC "-//W3C//DTD XHTML 1.0 Transitional//EN"
    "http://www.w3.org/TR/xhtml1/DTD/xhtml1-transitional.dtd">
<html xmlns="http://www.w3.org/1999/xhtml"
      xmlns:h="http://java.sun.com/jsf/html"
      xmlns:f="http://java.sun.com/jsf/core"
      xmlns:composite="http://java.sun.com/jsf/composite">
<head>
  <title>This will not be present in rendered output</title>
</head>
<body>
<composite:interface>
  <composite:attribute name="label" required="true"/>
  <composite:attribute name="value" required="true"/>
  <composite:attribute name="required" required="false"/>
  <composite:editableValueHolder name="input"/>
</composite:interface>
<composite:implementation>
  <h:outputLabel value="#{cc.attrs.label}"/>
  <h:inputText id="input" value="#{cc.attrs.value}" required="#{cc.attrs.required}">
    <f:ajax execute="input" event="blur" render="input-error"/>
  </h:inputText>
  <h:messages id="input-error" for="input"/>
</composite:implementation>
</body>
</html>
I think that composite components are a simple way to create code
snippets, you are going to use throughout your application.
A simple classic component
We are going to create a component which outputs *<div>hello</div>
- in a facelet xhtml. Facelets are the default rendering approach
for JSF 2.
We need
- a component class, which generates the output in our case
- a tag library file which describes our component and its
attributes - an entry in the web.xml (Depending on the packaging)
to encourage JSF to find the tag library.
We don’t need at the moment a tag library definition file, any
entries in faces-config.xml or a renderer class.
You have two options to create a JSF component. The first one is
to extend from the class UIComponentBase and to override the
methods you need to change. This class provides a range of useful
methods you need in most cases and is intended to be used as base
class for new components. In JSF 2 this is the class to be used as
base class for components. If your component is very similar to an
existing component, then you may better use the existing as base
class. For example UIInput provides already a number of
methods for input handling, converting and validation. If your
component can receive input then you might use that class. All
components of JSF 2 extend the UIComponentBase. In our case,
we will use the UIComponentBase as we just want to output a
simple div .
Have a look at the class first, then I will give you a
description.
package de.laliluna.howto.components;
import javax.faces.component.UIComponentBase;
import javax.faces.component.FacesComponent;
import javax.faces.context.FacesContext;
import javax.faces.context.ResponseWriter;
import java.io.IOException;
@FacesComponent("de.laliluna.howto.components.MySampleComponent")
public class MySampleComponent extends UIComponentBase{
  public String getFamily() {
    return "de.laliluna.sample";
  }
  @Override
  public void encodeBegin(FacesContext context) throws IOException {
    ResponseWriter writer = context.getResponseWriter();
    writer.startElement("div", null);
    writer.write("hello");
    writer.endElement("div");
  }
}
@FacesComponent
The annotation defines that the class
de.laliluna.howto.components.MySampleComponent is a component
and that it is mapped to the type
“de.laliluna.howto.components.MySampleComponent”. I
used the same name but you may use a different name for your type.
JSF will scan the classpath of your application to find components.
In addition it will scan any JARs, if the JAR contains at least an
empty /META-INF/faces-config.xml.
Alternatively to the annotation
introduced in JSF 2, you can use an XML configuration. If you want to
use XML instead of annotations, add the following entry in your
faces-config.xml :
 <component>
     <component-type>de.laliluna.howto.components.MySampleComponent</component-type>
     <component-class>de.laliluna.howto.components.MySampleComponent</component-class>
   </component>
</faces-config>
Disabling the class path scan
If you don’t want to let JSF scan the class path, you can add the
attribute metadata-complete to the /WEB-INF/faces-config.xml .
<faces-config ... metadata-complete="true">
getFamily
The method getFamily is used to select a renderer. JSF allows to
separate the component from the rendering in order to allow rendering
in different formats. ‘It allows’ means that you don’t have to.
In our case we overrode the encode method and did the rendering right
there. As a consequence this method plays no role at all.
Encoding and rendering
The rendering in JSF happens in the RenderPhase. If you have a
look into the source code of the UIComponentBase class, you
can see that the encodeBegin method creates an event,
checks if the component should actually render itself, than tries to
get a renderer and executes the method encodeBegin of the
renderer.
Using a separate renderer has the advantage that you can easily
replace either the component or the renderer by configuration in the
faces-config.xml. This is probably the best choice, if you write a
component collection to be used by other people or if you want to
provide rendering for different output formats. If you just want to
write a couple of components to generate XHTML code, just leave the
renderer aside.
I will provide you with some more insight into rendering later in
this chapter.
Taglib
The next step is to create a tag library. It describes the tags
and which component type will process it. Create the tag library
either in /WEB-INF or in /META-INF/ of the web root. The tag
reference the type name of the component not the class name. The name
of the taglib should end with .taglib.xml (see below). If you package
your components separately in a JAR, then the taglib is automatically
detected, if it is in the META-INF directory. Keep in mind that you
need at least an empty faces-config.xml in this directory as
well. Otherwise JSF doesn’t recognize the JAR as JSF module.
<!DOCTYPE facelet-taglib PUBLIC
  "-//Sun Microsystems, Inc.//DTD Facelet Taglib 1.0//EN"
  "http://java.sun.com/dtd/facelet-taglib_1_0.dtd">
<facelet-taglib>
  <namespace>http://www.laliluna.de/components/sample</namespace>
  <tag>
    <tag-name>hello</tag-name>
    <component>
      <component-type>de.laliluna.howto.components.MySampleComponent</component-type>
    </component>
  </tag>
</facelet-taglib>
The last step is to add the taglib as param in the web.xml. The
param-value contains a semicolon separated list of taglibs.
<context-param>
  <param-name>javax.faces.FACELETS_LIBRARIES</param-name>
  <param-value>/WEB-INF/sample-components.taglib.xml</param-value>
</context-param>
Please note that we only need to add
this parameter if we create our components directly in our web
application. If you package components separately in JARs and add
them to WEB-INF/lib of your web application, then you only need to
define an at least empty faces-config.xml and the taglib in
/META-INF of your component JAR. VERY IMPORTANT: In that case the
taglib file must end with .taglib.xml (DOT taglib DOT xml).
Here is a sample directory structure
with components packaged as JAR.
home.xhtml
index.jsp
template.xhtml
WEB-INF/classes/de/laliluna/howto/beans/ArticleBean.class
WEB-INF/classes/de/laliluna/howto/model/Article.class
WEB-INF/classes/de/laliluna/howto/services/ArticleService.class
WEB-INF/classes/de/laliluna/howto/services/ArticleServiceImpl.class
WEB-INF/classes/de/laliluna/howto/services/ServiceFactory.class
WEB-INF/classes/de/laliluna/howto/services/ServiceFactoryImp.class
WEB-INF/faces-config.xml
WEB-INF/lib/components.jar
WEB-INF/web.xml
The content of the components archive is
META-INF/MANIFEST.MF
META-INF/faces-config.xml
META-INF/sample-components.tld
META-INF/sample-components.taglib.xml
de/laliluna/howto/components/MySampleComponent.class
Rendering
A page or to use the JSF terminology a view consists of a
component tree. There is a root component with a number of child
components which may have child components, which may have child
components which may …. During the rendering the component tree is
traversed and every component is ask to render it self (more or
less).
The rendering happens in the render response phase. The phase
calls the renderView method of the view handler. The view
handler determines the view handling strategy of the view declaration
language (Facelets or JSP) and, in case of a Facelet, executes the
renderView method of the FaceletViewHandlingStrategy. This
method calls the encodeAll method of the root component of the
view to start the rendering. The following picture shows a slightly
shorted encodeAll method of the UIComponent class and explains
every step.
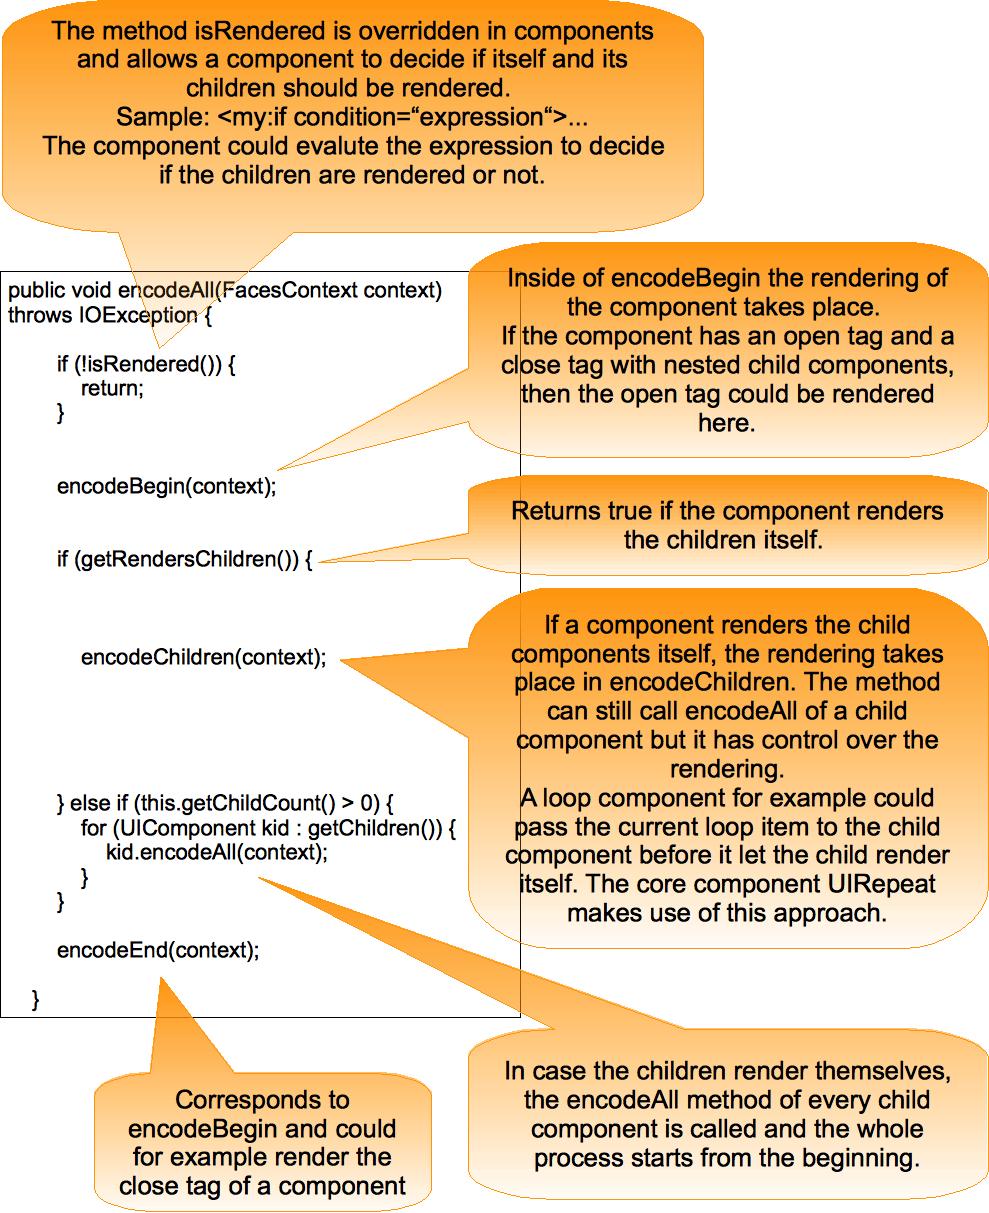
The UIComponentBase provides default implementations for all
methods called in encodeAll.
Other sources
Nice series of article on various new features of JSF 2
http://www.ibm.com/developerworks/java/library/j-jsf2fu1/index.html
Short article on writing a first composite component
http://weblogs.java.net/blog/driscoll/archive/2008/11/writing_a_simpl.html
Articles on component development based on JSF 1.2
http://www.ibm.com/developerworks/web/library/wa-aj-simplejava4.html
http://www.jsftutorials.net/components/step1.html
Article on composite components with JSF 2
http://weblogs.java.net/blog/driscoll/archive/2008/11/writing_a_simpl.html
Article on Ajax enabled component development with JSF 2
http://weblogs.java.net/blog/driscoll/archive/2009/10/09/jsf-2-custom-java-components-and-ajax-behaviors
Article showing how to implement a custom lifecycle to handle
exceptions. Though this can be better solved with an exception
handler in JSF 2, the article is still useful as it explains how to
create your own lifecycle factory.
http://insights2jsf.wordpress.com/2009/07/20/using-a-custom-lifecycle-implementation-to-handle-exceptions-in-jsf-1-2/
Detailed online book on JSF 2 with MyFaces, German language only
http://jsfatwork.irian.at/semistatic/introduction.html
Article on custom EL-resolver
http://java.sun.com/mailers/techtips/enterprise/2006/TechTips_Aug06.html
Blog Entry on exception handling with JSF 2
http://weblogs.java.net/blog/edburns/archive/2009/09/03/dealing-gracefully-viewexpiredexception-jsf2
Blog article on Redirect-on-Post with JSF 1.2
http://balusc.blogspot.com/2007/03/post-redirect-get-pattern.html
Double submit handling for input forms
Was written for JSF 1.x but you can follow the same idea to
implement it for JSF 2 as well.
http://www.jroller.com/mert/entry/jsf_preventing_double_form_submit
Component libraries
Matrix comparing different JSF 1.2 component collections
http://www.jsfmatrix.net/
New component collection dedicated to JSF 2
http://kenai.com/projects/scales/pages/Home
IceFaces
http://www.icefaces.org/
JBoss Richfaces
http://www.jboss.org/richfaces
MyFaces Trinidad and Tobago
http://myfaces.apache.org/
Oracle ADF
http://www.oracle.com/technology/products/adf/index.html
PrimeFaces
http://primefaces.prime.com.tr/en/
Security related sources
Article on security with JSF
http://blogs.sun.com/enterprisetechtips/entry/improving_jsf_security_configuration_with
Article on programmatically logging in using JAAS
http://weblogs.java.net/blog/2006/03/07/repost-using-jaas-jsf
Article explaining how to write your own JAAS module
http://www.javaranch.com/journal/2008/04/authentication-using-JAAS.html
Performance and scalability
This chapter will only be included in the PDF version, which is
available at http://www.laliluna.de/shop